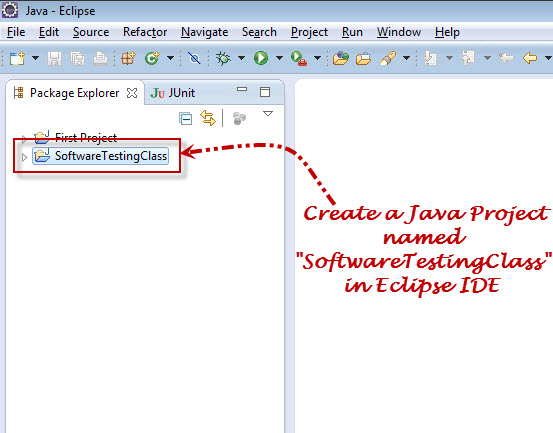
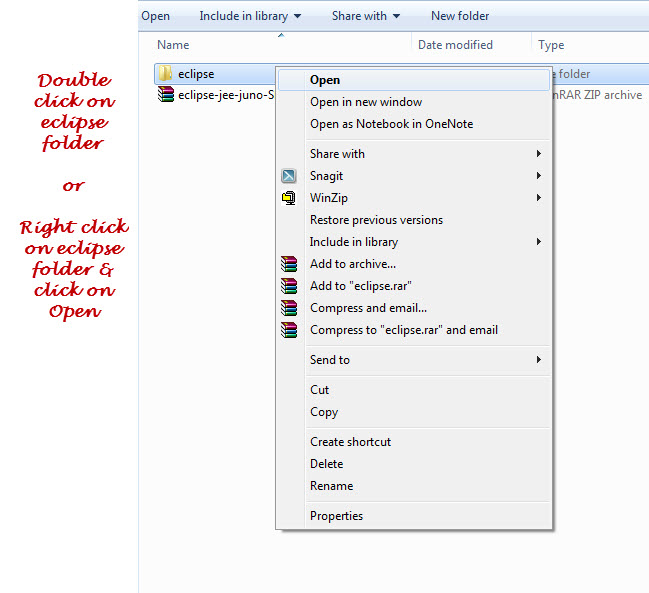
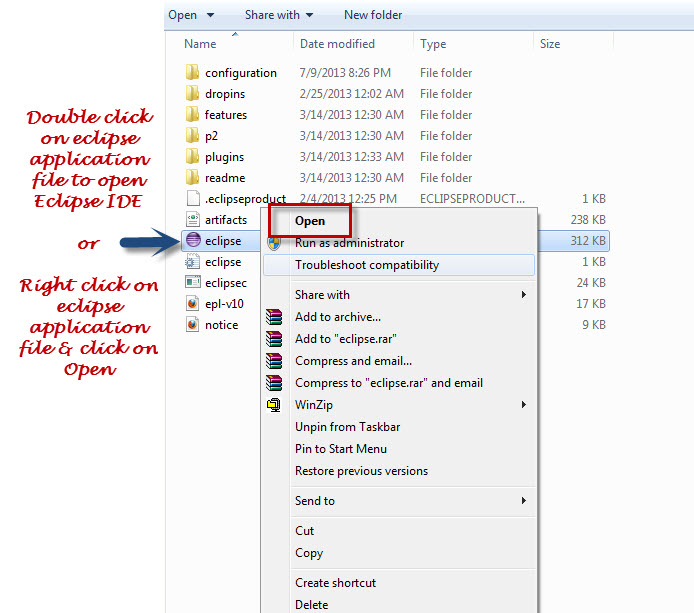
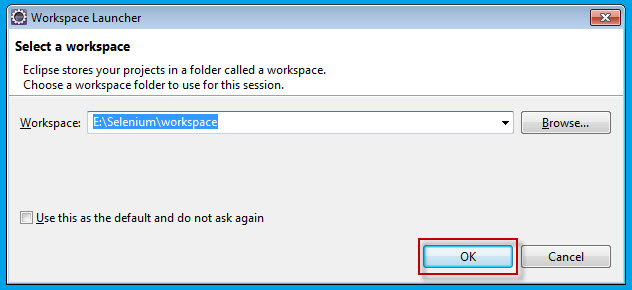
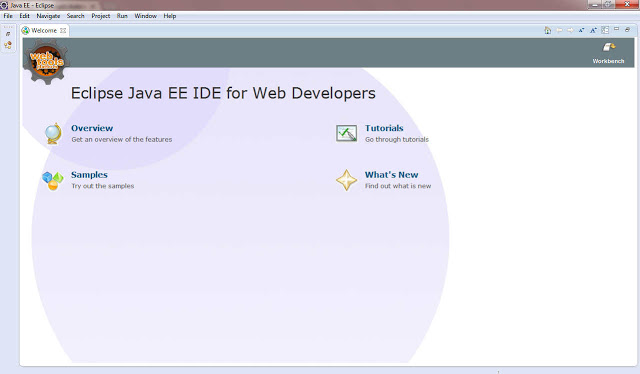
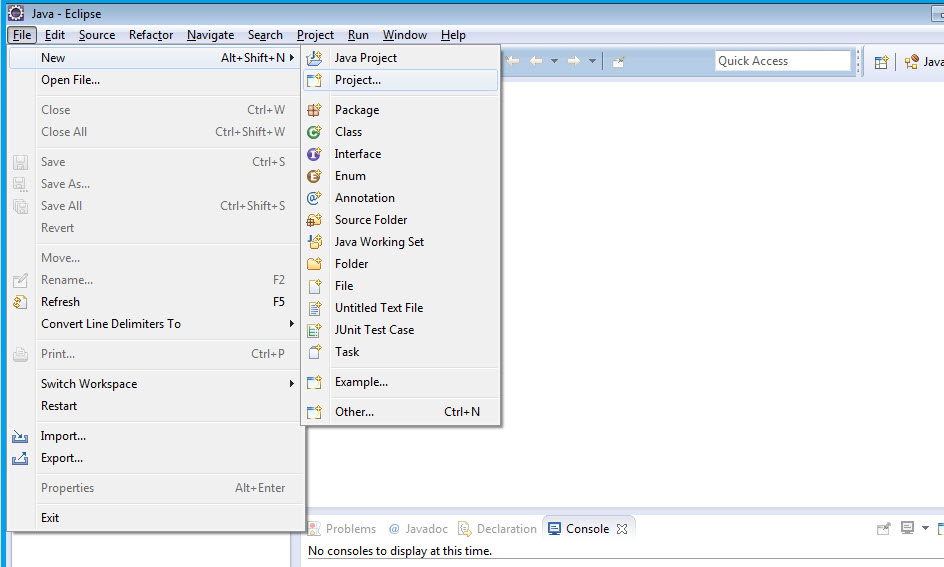
1.How to create selenium maven project.
2.run tests using maven project.
3.selenium grid setup and execute sample test case using grid.
1.How to create selenium maven project
step1: Down load eclipse kepler IDE from eclipse downloads
https://www.eclipse.org/downloads/download.php?file=/technology/epp/downloads/release/kepler/SR1/eclipse-java-kepler-SR1-win32.zip
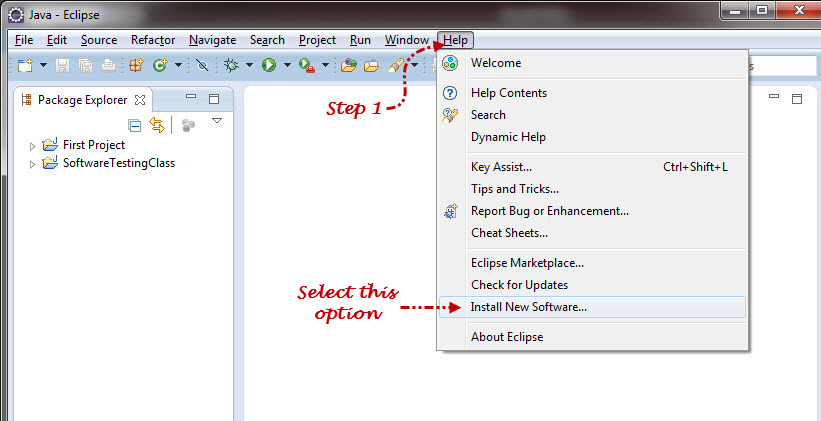
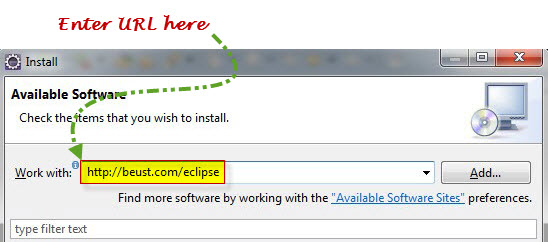
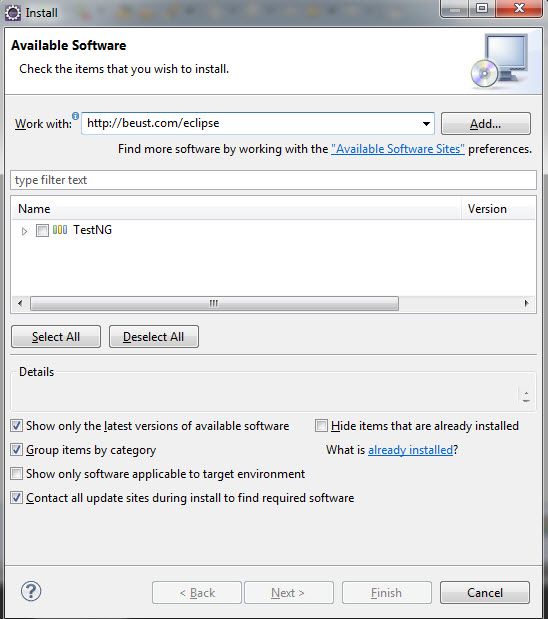
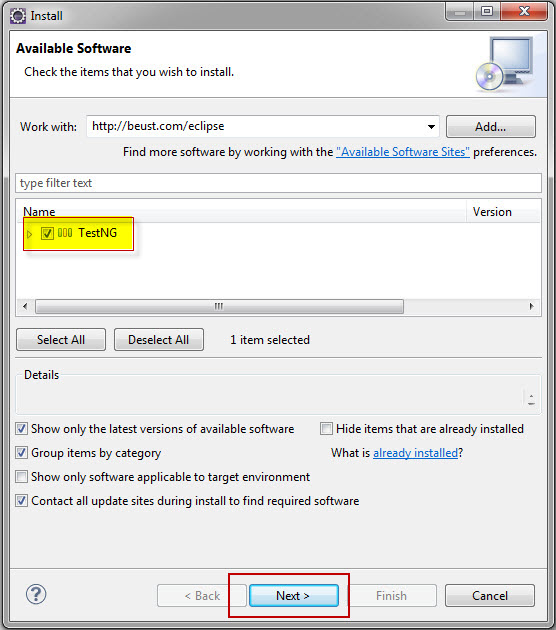
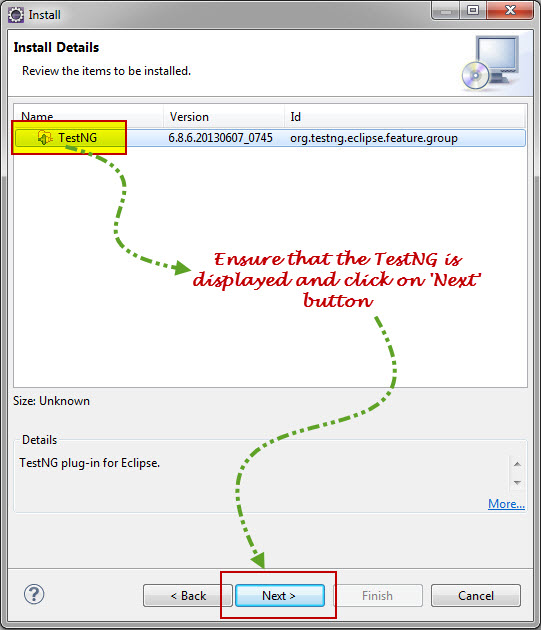
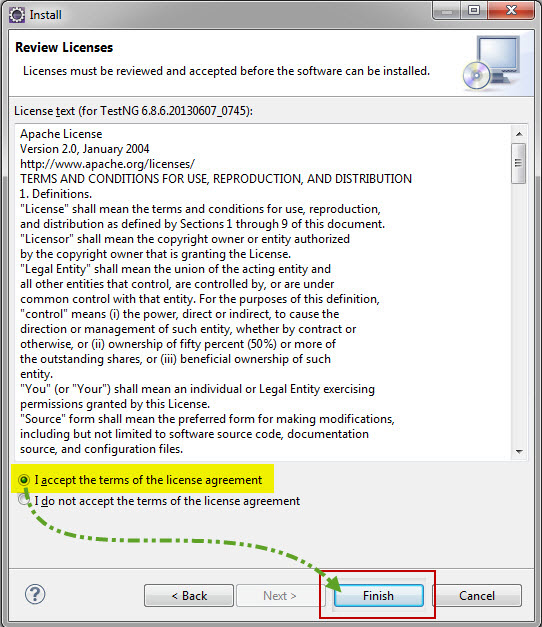
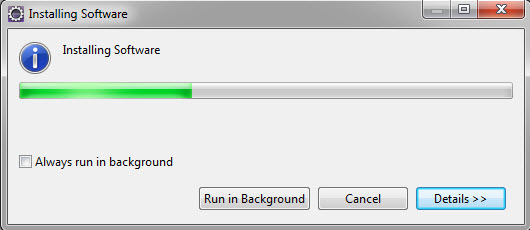
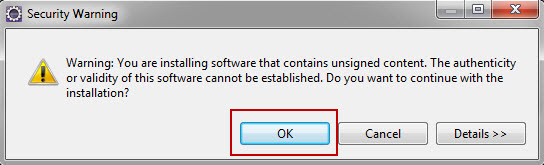
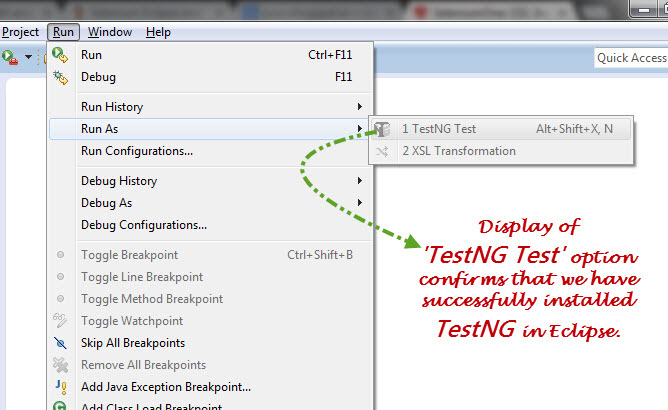
step 2: install maven and testng plugin from eclipse help--->install new software
add below sites and install testng and maven
TestNG - http://beust.com/eclipse
Maven - http://download.jboss.org/jbosstools/updates/m2e-extensions/m2e-apt.
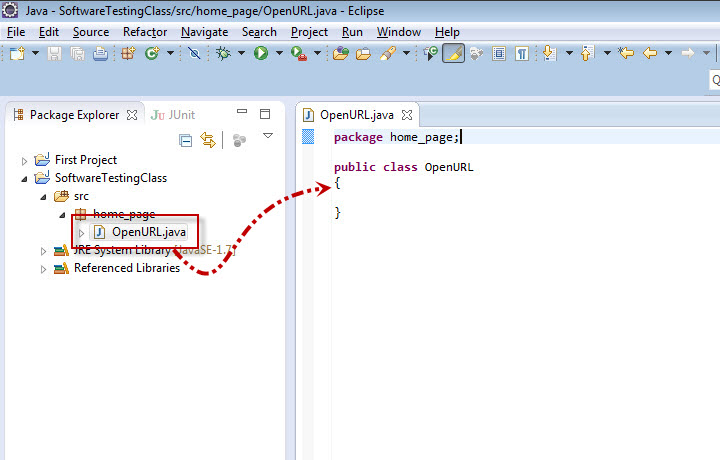
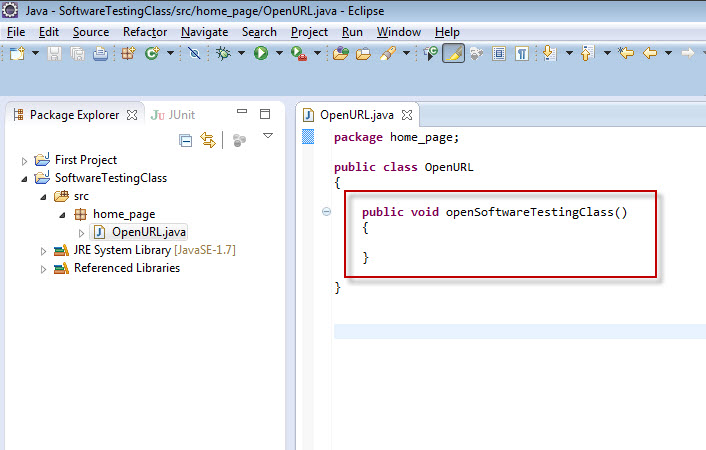
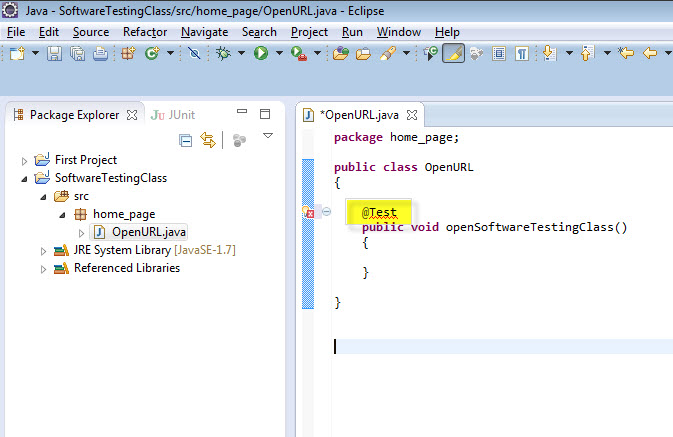
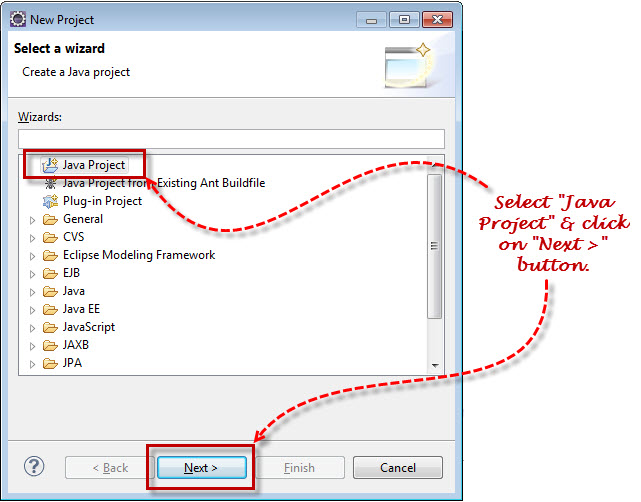
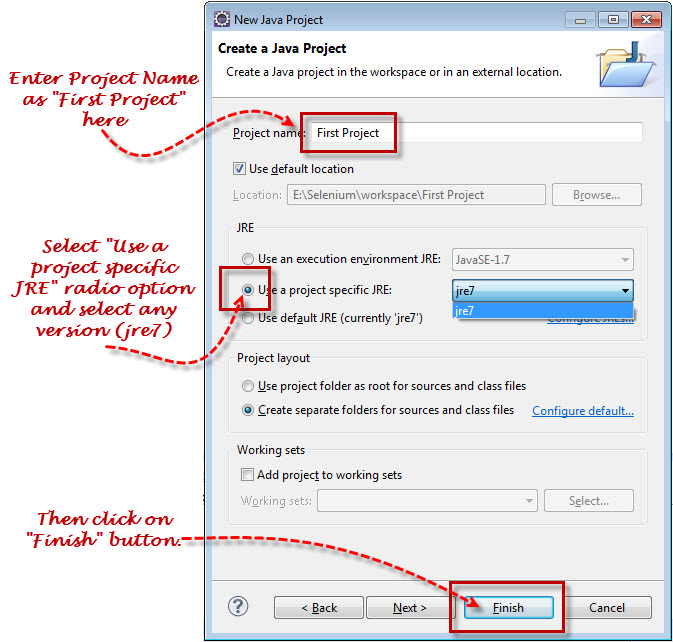
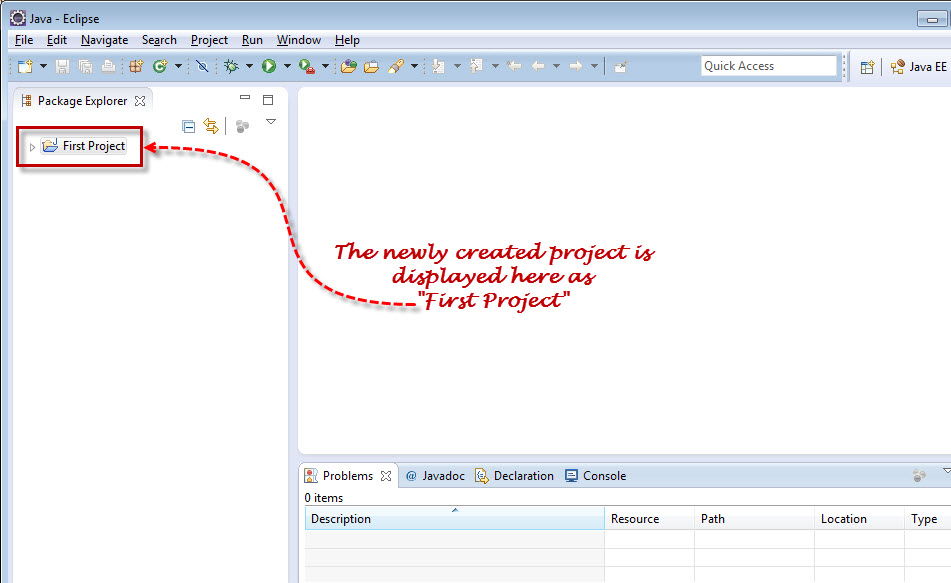
step 3:
create maven project in eclipse and add below depedency tags in pom.xml file.
step4: selenium maven dependency and testng maven dependency
<dependency>
<groupId>org.testng</groupId>
<artifactId>testng</artifactId>
<version>6.1.1</version>
<scope>test</scope>
</dependency>
<dependency>
<groupId>org.seleniumhq.selenium</groupId>
<artifactId>selenium-java</artifactId>
<version>2.37.1</version>
</dependency>
</dependencies>
step:4
right click on maven project and select maven--->update project option
update project will download latest testng and selenium jars in to .m2 folder in
example:C:\Users\Home\.m2
now you are ready to use your selenium maven project.
for reference you can use my maven project from git repository
https://github.com/naveenkumarks/selenium.git
Note :to download git project install git bash in your local pc
http://git-scm.com/download/win
After installation of git use below command to download selenium maven project.
step1: open git bash
step2: run below command in git bash
git clone https://github.com/naveenkumarks/selenium.git
your GIT bash screen will be like this.
import downloaded maven project
1.click file---->import from eclipse
2.select existing maven project
3.after import successful below screen will come to make sure you import successful
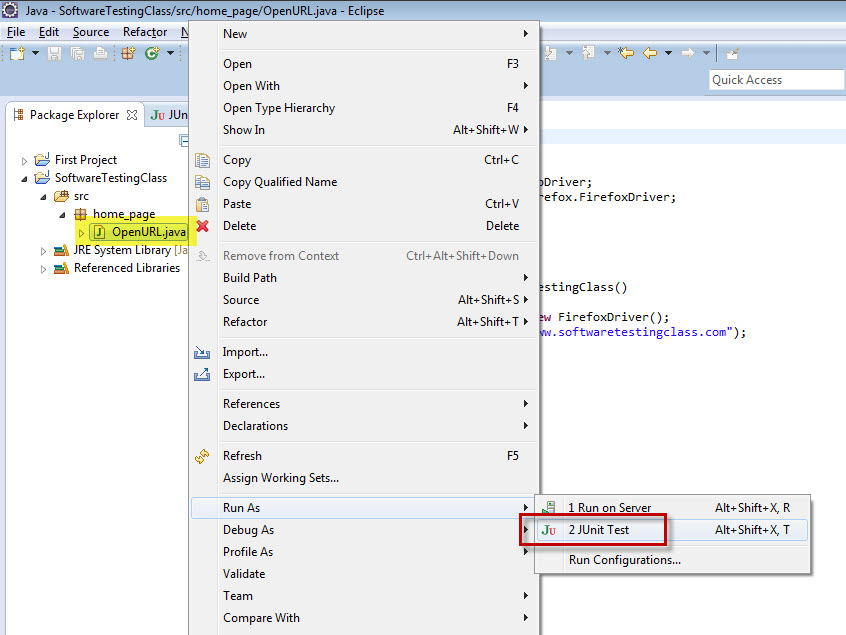
4.click finish and select maven project from eclispe and do right click and select
maven--->update project
5.after update .m2 folder will get all latest testng and selenium jar files.
i have explained two ways to create maven selenium project
1.import from existing maven project
2.create maven project from scratch.
GUI Automation Using Selenium and Junit usgae with selenium RC and Webdriver
I will update following topics every day.if any one knows any updates on following topics please help me.
this topics are updating as per my knowledge.if any mistakes please correct me.
1.how to setup a selenium project in eclipse
2.how to write sample login using selenium webdriver.
3.basics of junit frame work and different annotations .
4.how to parameterize login with different username and passwords.
5.how to integrate ant in your selenium project.
6 how to configure log4j in selenium project.
7.how to read and write data from excel sheet using poi jars.
8.how to configure sqljdbc jar to your selenium project.
9.how to handle multiple browsers using webdriver.
10.Login application with multiple userid and password using junit parameters annotation
11.Read google search Ajax data(ex:type "apple" in search box and do not enter button and "apple" string results"
1.How to configure selenium project in eclipse.
1.install first Java in your pc and configure java_home and java path in system variable
open command prompt and check java version
C:\Users\Home>java -version
java version "1.6.0_31"
Java(TM) SE Runtime Environment (build 1.6.0_31-b05)
Java HotSpot(TM) Client VM (build 20.6-b01, mixed mode, sharing).
2.Download eclipse from eclipse download location.
http://www.eclipse.org/downloads/
eclipse-jee-europa-winter-win32.
3.Download selenium-java-2.15.0.jar and selenium-server-standalone-2.16.0.jar from selenium hq website.
http://seleniumhq.org/
4.open eclipse and create project
 |
| Create eclipse java project. |
5.Add lib folder in create java project.
 |
lib folder inside java project
|
6.Copy selenium
selenium-java-2.15.0.jar and selenium-server-standalone-2.16.0.jar in lib folder .
 |
copy
selenium-java-2.15.0.jar and selenium-server-standalone-2.16.0.jar in lib folder.
|
7.select jar files inside lib in eclipse and right click and select
addtobuild path option in eclipse.
 |
| selenium jars add to build path. |
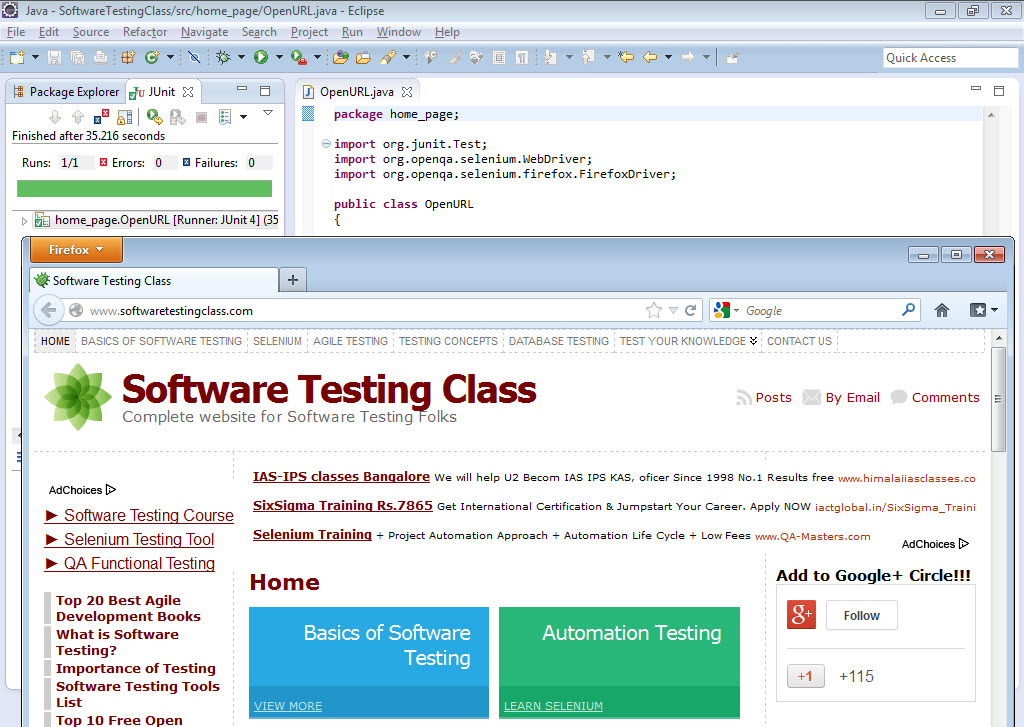
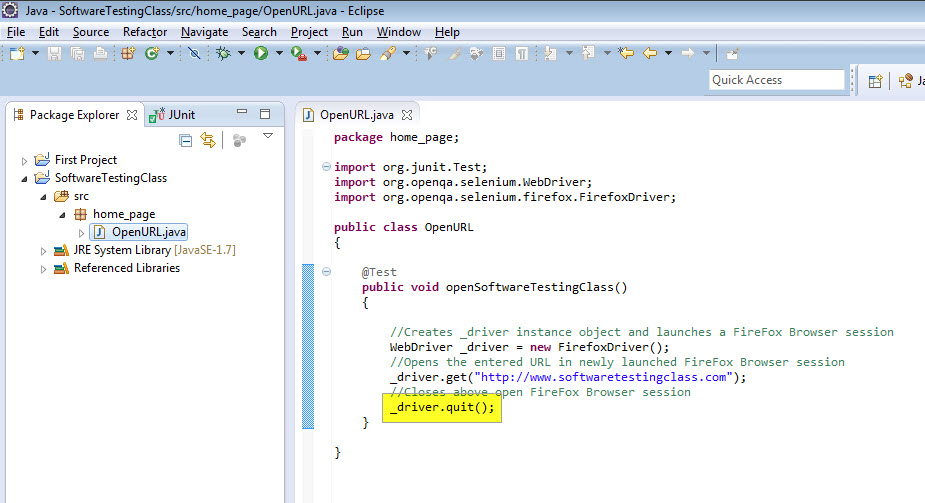
8.Create new class in java project and start using selenium.
Note:I have explained all examples using Gmail and actitime application
2.how to write sample login using selenium webdriver.
Before starting i want to tell you about GUI automation basic funda :
Any tool QTP/RFT or selenium will identify GUI elemenst based on webelement properties.
Step1:find element on browser using element properties. .
2.operate on element (Actions: click,set text and get text from text box ).
Selenium basically identify GUI webelements using ID,NAME,XPATH AND CSS PATH.
i will start GUI automation using gmail login
NOTE:To identify web element properties using IE devlopers tool in
internet explorer and in firefox using firebug tools.(and even you can
find xpath using firebug).
 |
| element propery for username is "Email" |
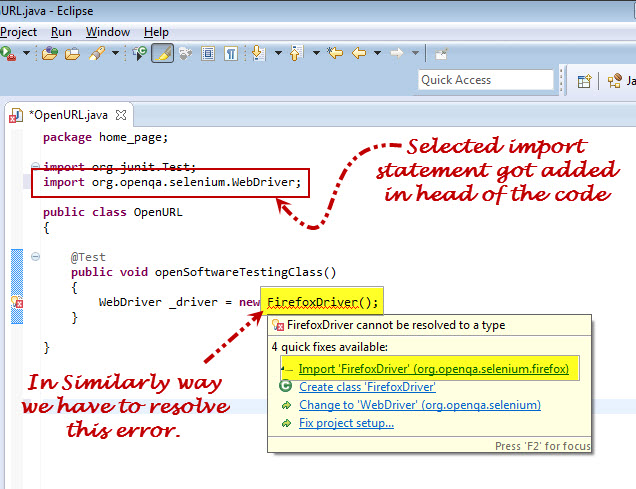
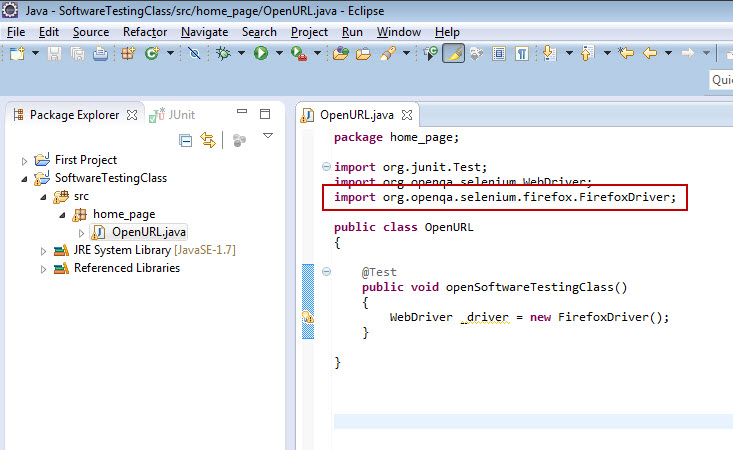
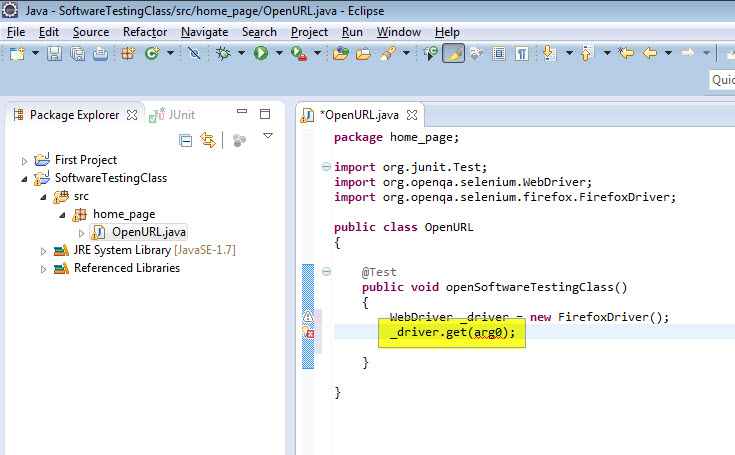
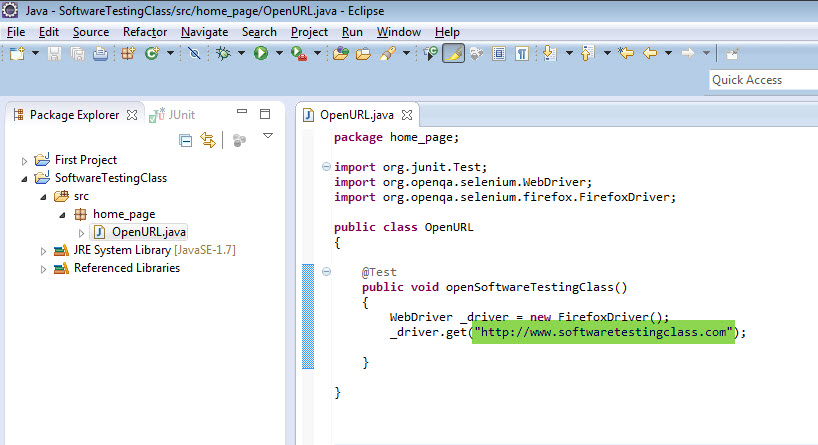
LOGIN Script:
import org.junit.Test;
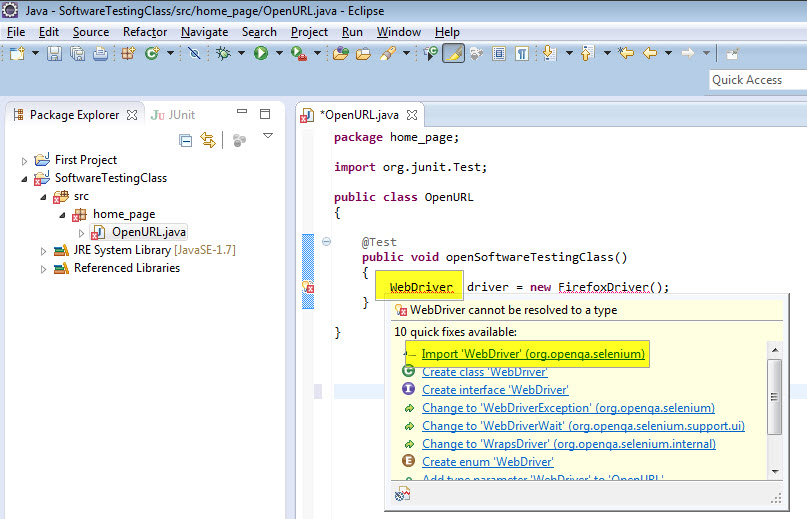
import org.openqa.selenium.By;
import org.openqa.selenium.WebDriver;
import org.openqa.selenium.WebElement;
import org.openqa.selenium.ie.InternetExplorerDriver;
import org.openqa.selenium.remote.DesiredCapabilities;
public class CreateNewClass {
//login gmail using webdriver
WebDriver Browser;
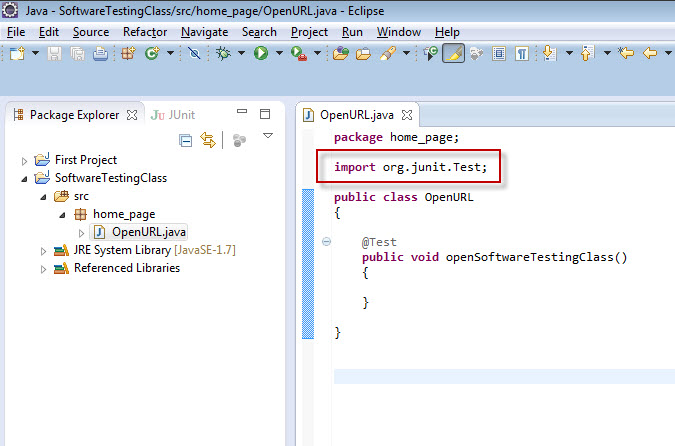
@Test //junit annotation
public void loginGmail()
{
DesiredCapabilities ieCapabilities = DesiredCapabilities.internetExplorer();
ieCapabilities.setCapability(InternetExplorerDriver.INTRODUCE_FLAKINESS_BY_IGNORING_SECURITY_DOMAINS, true);
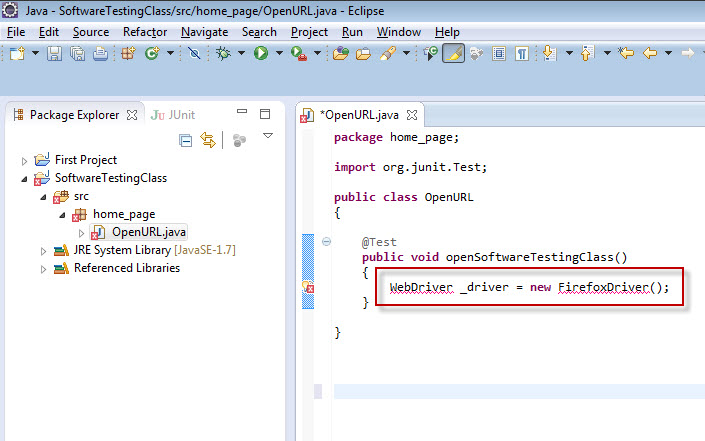
//create webdriver object for internetexplorer
Browser=new InternetExplorerDriver(ieCapabilities);
//launch Gmail using get() method
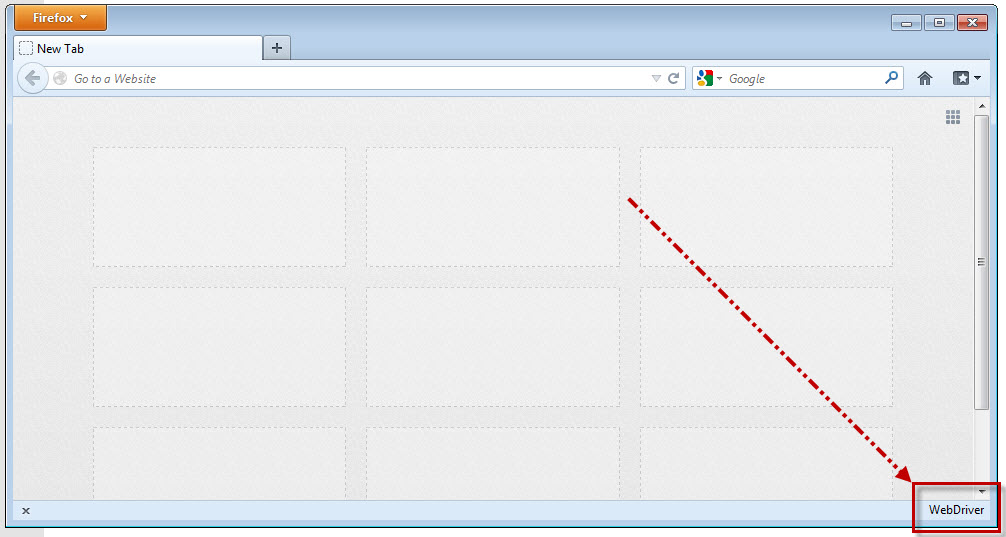
Browser.get("http://www.gmail.com");
//find username text field using name property
WebElement username=Browser.findElement(By.id("Email"));//find and store webelement in username.
//Action on webelement.set text field using send keys.
username.sendKeys("enter your user name");
//find password text box on gmail home page.
WebElement password=Browser.findElement(By.id("Passwd"));//find and store webelement in password
//Action on webelement.set text field using send keys.
password.sendKeys("enter your password");
//find sign button using name property.
WebElement signin=Browser.findElement(By.id("signIn"));
//Action on webelement.set text field using send keys.
signin.click();
}
9.how to handle multiple browsers using webdriver.
import java.util.ArrayList;
import java.util.Iterator;
import java.util.List;
import java.util.Set;
import org.junit.Test;
import org.openqa.selenium.By;
import org.openqa.selenium.WebDriver;
import org.openqa.selenium.ie.InternetExplorerDriver;
import org.openqa.selenium.remote.DesiredCapabilities;
public class DialogHndl {
@Test
public void dialog() throws Exception
{
DesiredCapabilities ieCapabilities = DesiredCapabilities.internetExplorer();
ieCapabilities.setCapability(InternetExplorerDriver.INTRODUCE_FLAKINESS_BY_IGNORING_SECURITY_DOMAINS,true);
System.out.println("dialog test");
WebDriver browser=new InternetExplorerDriver(ieCapabilities);
browser.get("http://home-pc:8080/login.do");
browser.findElement(By.name("username")).sendKeys("admin");
browser.findElement(By.name("pwd")).sendKeys("manager");
browser.findElement(By.id("loginButton")).click();
Thread.sleep(1000);
browser.findElement(By.linkText("Create new tasks")).click();
Set<String> hndls=browser.getWindowHandles();
Iterator itr=hndls.iterator();
while(itr.hasNext())
{
if(browser.getTitle().equals("actiTIME - Enter Time-Track"))
{
itr.hasNext();
browser.switchTo().window((String)itr.next());//this method is switch between windows
System.out.println(browser.getTitle());
}
}
Thread.sleep(1000);
System.out.println(browser.getTitle());
browser.findElement(By.name("task[0].name")).sendKeys("naveen");
browser.findElement(By.id("task0.image")).click();
Thread.sleep(1000);
// browser.switchTo().activeElement();
browser.findElement(By.name("comment")).sendKeys("this is subba naveen");
browser.findElement(By.name("nscbutton")).click();
}
}
10.Login application with multiple userid and password using junit parameters annotation
import java.util.Arrays;
import java.util.Collection;
import java.util.List;
import org.junit.Before;
import org.junit.Test;
import org.junit.runner.RunWith;
import org.junit.runners.Parameterized;
import org.junit.runners.Parameterized.Parameters;
import org.openqa.selenium.By;
import org.openqa.selenium.WebDriver;
import org.openqa.selenium.ie.InternetExplorerDriver;
import org.openqa.selenium.remote.DesiredCapabilities;
@RunWith(Parameterized.class)
public class JavaPrograms {
public String username;
public String password;
//public int empid;
public JavaPrograms(String userName,String passwd)
{
this.username=userName;
this.password=passwd;
//this.empid=Empid;
}
@Parameters
public static Collection<Object[]> getdata()
{
Object[][] data=new Object[3][2];
// 1st row
data[0][0]="admin";
data[0][1]="manager";
//
data[0][2]=123;
// 2nd row
data[1][0]="admin";
data[1][1]="manager";
//data[1][2]=456;
// 3nd row
data[2][0]="admin";
data[2][1]="manager";
//data[2][2]=456;
//return null;
return Arrays.asList(data);
}
@Test
public void para() throws Exception
{
DesiredCapabilities ieCapabilities = DesiredCapabilities.internetExplorer();
ieCapabilities.setCapability(InternetExplorerDriver.INTRODUCE_FLAKINESS_BY_IGNORING_SECURITY_DOMAINS,true);
System.out.println("dialog test");
WebDriver browser=new InternetExplorerDriver(ieCapabilities);
browser.get("http://home-pc:8080/login.do");
browser.findElement(By.name("username")).sendKeys(username);
browser.findElement(By.name("pwd")).sendKeys(password);
browser.findElement(By.id("loginButton")).click();
Thread.sleep(1000);
browser.findElement(By.linkText("Logout")).click();
browser.close();
}
}
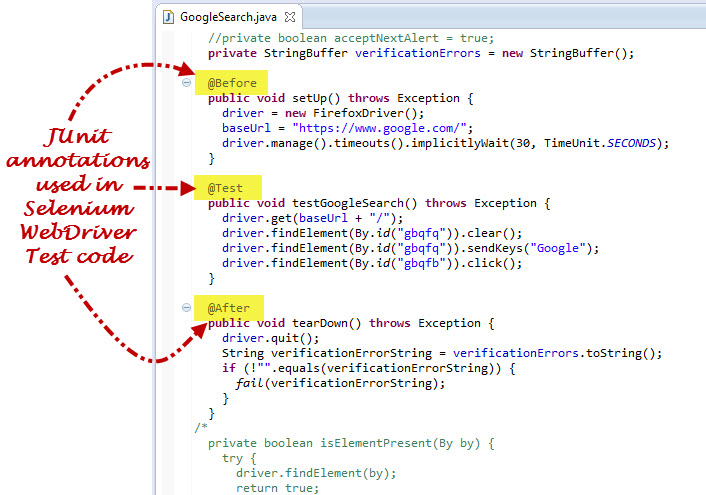
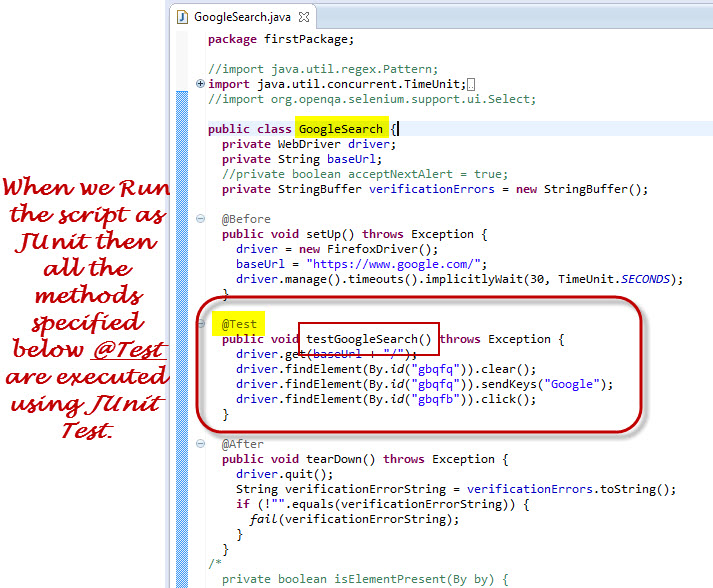
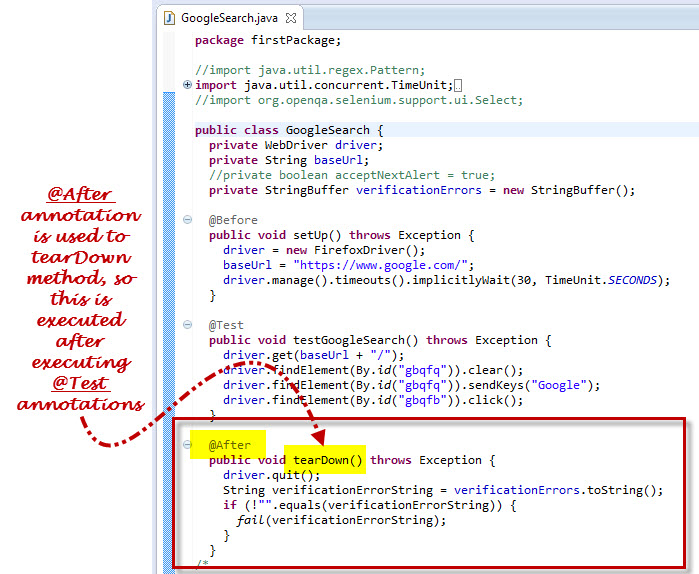
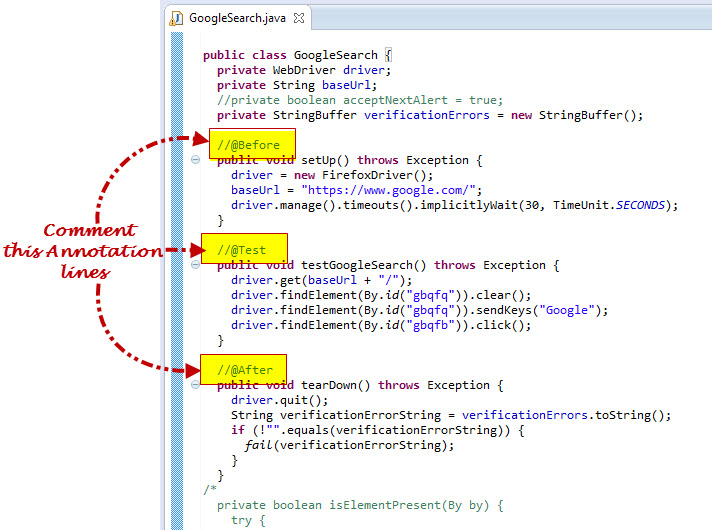
3.basics of junit frame work and different annotations .
junit frame work will work mainly on annotations
List of annotations is useful for beginners to start junit framework with selenium
1.@before
2.@After
3.@Test
4.@BeforeClass
5.@AfterClass
6.@Ignore
7.
@Rule
Usage of @before @After and @Test usage.
following example will explain @before and @after will execute Testcase level.
package junit;
import org.junit.After;
import org.junit.Before;
import org.junit.Test;
public class Testclass2 {
@Before
public void setup()
{
System.out.println("Testcase level intial condition");
}
@Test
public void TC1()
{
System.out.println("testcase1");
}
@Test
public void TC2()
{
System.out.println("testcase2");
}
@After
public void TearDown()
{
System.out.println("Clear the Testcase conditions");
}
}
output:
Testcase level intial condition @before
testcase1 @testmethod
Clear the Testcase conditions@After
Testcase level intial condition@Before
testcase2 @testmethod
Clear the Testcase conditions@After
11.Read google search Ajax data(ex:type "apple" in search box and do not enter button and "apple" string results"
import java.util.List;
import org.junit.Test;
import org.openqa.selenium.By;
import org.openqa.selenium.WebDriver;
import org.openqa.selenium.WebElement;
import org.openqa.selenium.ie.InternetExplorerDriver;
import org.openqa.selenium.remote.DesiredCapabilities;
public class Ajax {
String Search="huawei";
@Test
public void name() throws Exception {
DesiredCapabilities ieCapabilities = DesiredCapabilities.internetExplorer();
ieCapabilities.setCapability(InternetExplorerDriver.INTRODUCE_FLAKINESS_BY_IGNORING_SECURITY_DOMAINS,true);
WebDriver web=new InternetExplorerDriver(ieCapabilities);
web.get("http://google.com");
web.findElement(By.name("q")).sendKeys(Search);
Thread.sleep(1000);
List<WebElement> list=web.findElements(By.xpath("//*/span[1]/b[1]"));
System.out.println(list.size());
for (WebElement webElement : list) {
System.out.println(Search+" "+webElement.getText());
}
}
}
7.how to read and write data from excel sheet using poi jars.
A.How to write data in to Excel sheet.
package junit;
import java.io.FileInputStream;
import java.io.FileNotFoundException;
import java.io.FileOutputStream;
import java.io.IOException;
import org.apache.poi.hssf.usermodel.HSSFCell;
import org.apache.poi.hssf.usermodel.HSSFRow;
import org.apache.poi.hssf.usermodel.HSSFSheet;
import org.apache.poi.hssf.usermodel.HSSFWorkbook;
import org.junit.Test;
public class ExcelWrite {
@Test
public void ExcelWrite() throws IOException
{
String excelfilepath="D:\\ExcelReadWrite.xls";
FileInputStream write=new FileInputStream(excelfilepath);
//Create work object and create sheet sheet name
HSSFWorkbook wb=new HSSFWorkbook(write);
System.out.println(wb);
HSSFSheet sheet=wb.createSheet("naveen");
System.out.println(sheet);
//i will write data for 10 rows and 10 coulmns
for(int i=0;i<=10;i++)
{
HSSFRow row=sheet.createRow(i);
for(int j=0;j<=10;j++)
{
HSSFCell cell=row.createCell(j);
cell.setCellValue("naveen");
}
}
FileOutputStream out=new FileOutputStream(excelfilepath);
wb.write(out);
out.close();
}
}