Following steps will guide you to write your own Selenium WebDriver script:
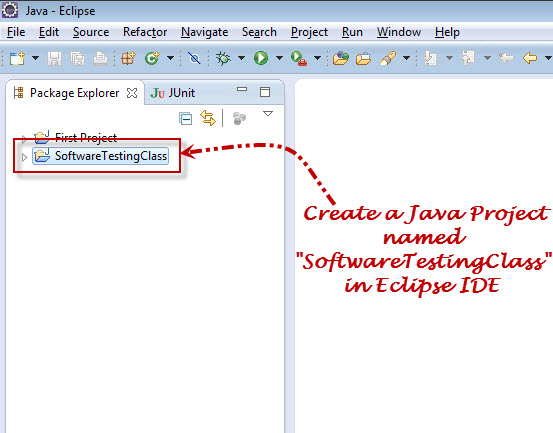
1. Launch Eclipse IDE & create a new Java Project called “SoftwareTestingClass” (To create new Java Project refer post “How to Create Project in Eclipse IDE?”)@@Link Color@@:

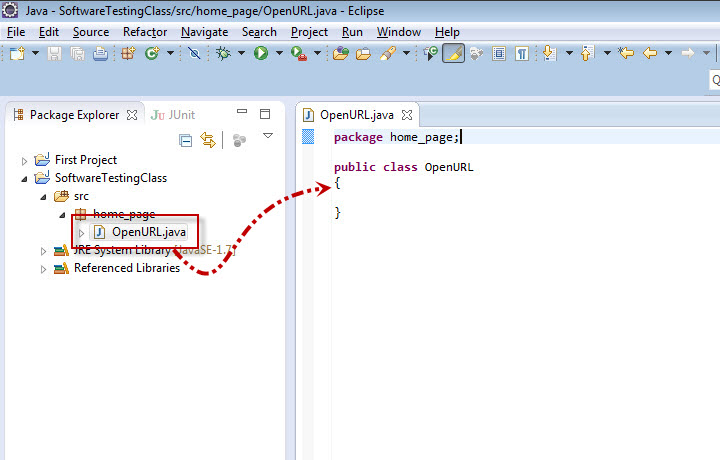
2. Inside newly created project, create New Package called “home_page” shown in below screenshot:

3. Under newly created Package, create New Class called “OpenURL” shown in below screenshot. The new class is displayed as “OpenURL.java”.

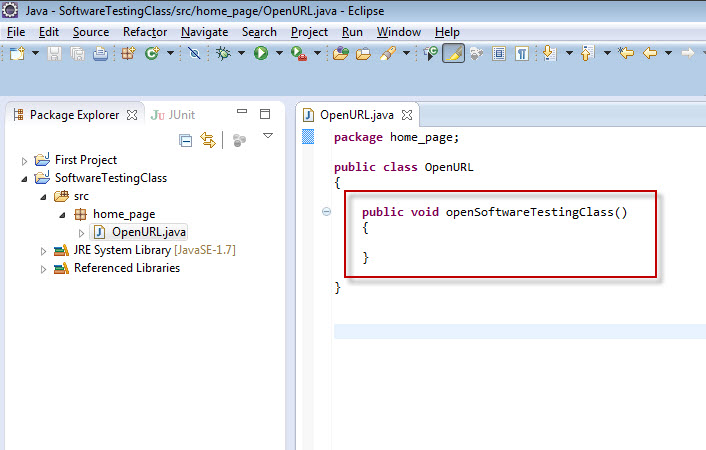
4. Once you created class on right side of above image you will the class name is displayed in the code editor. Now within “OpenURL” class create one new method called “openSoftwareTestingClass()” as shown below:

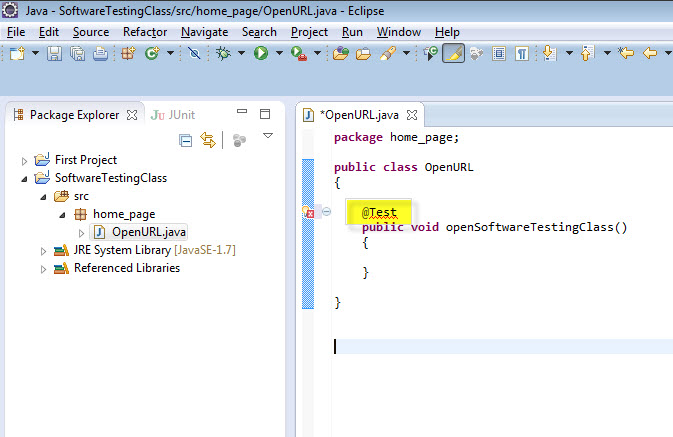
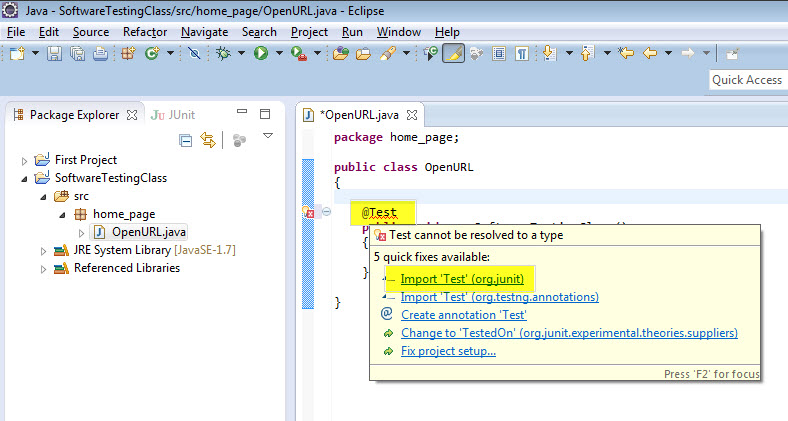
5. Add “@Test” annotation above method name “openSoftwareTestingClass()”. Once you add this annotation you will display error showing as below screen shot:

6. To resolve this annotation error we have to hover mouse over “@Test” & click on option “Import ‘Test’ (org.junit)” link shown below screenshot:

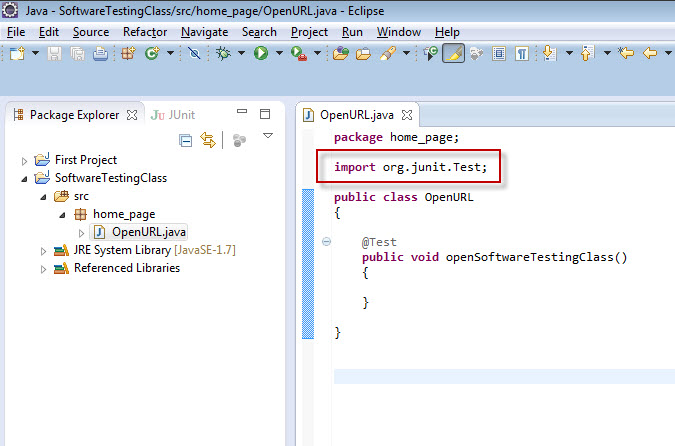
7. Once you executed above statement, the new import statement called “import org.junit.Test;” will be added in your code shown in below screenshot. Here we have imported pre-defined “Test” class from JUnit framework.

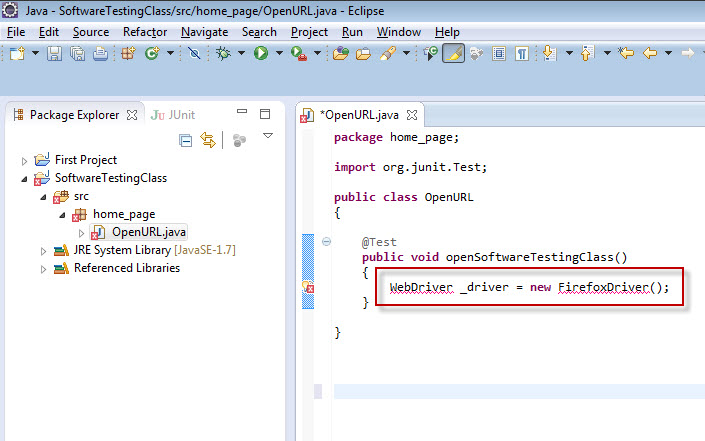
8. To execute test script in Selenium WebDriver we have to specify the web browser on which we have to execute the test script. So here we have created new Object to connect specified browser while executing our test script. In this script we have selected FireFox Browser. (Selenium WebDriver supports different browser like Chrome, Safari etc. based on your requirement you can use the browser in your test script.)

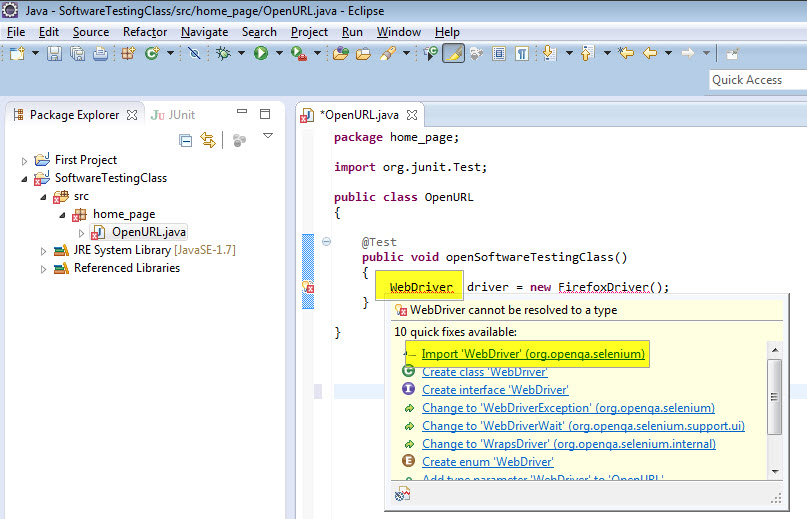
9. Now you will see two error in the newly added line above screenshot. In previous step we have imported predefined class from “WebDriver” from “open.openqa.selenium” package into our “SoftwareTestingClass” Class.
To resolve this error we have to hover mouse over ‘WebDriver’ & click on option “Import ‘WebDriver’ (org.openqa.selenium)” link shown below screenshot:

Make sure that once you imported WebDriver the first error is resolved & new import statement is added in the head of the code.
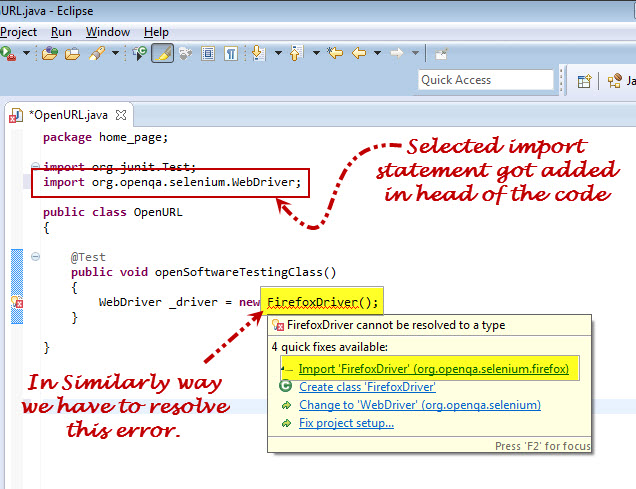
10. Similarly to resolve above second error we have to import predefined class “FirefoxDriver” from “open.openqa.selenium.firefox” package into our “SoftwareTestingClass” Class.

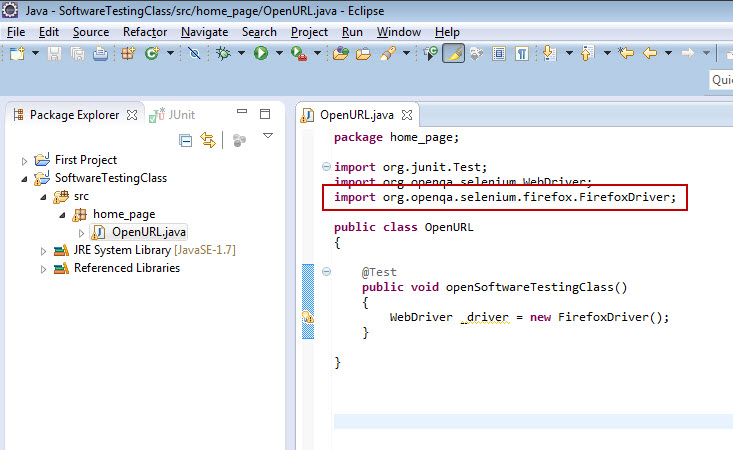
11. Ensure that new Import statement of FirefoxDriver is added in head of the code & all errors are resolved. now inbuilt FirefoxDriver Class functionality can be used in our “SoftwareTestingClass” Class.

12. Now I know you have question in mind where these line come from & what is exact meaning of this lines. So before going forward lets discuss meaning of each below statement one by one:
WebDriver _driver = new FirefoxDriver( );
13. Have you observed that in the creation statement of WebDriver object, FirefoxDriver( ) class is used without any parameter. If we do not provide any parameter then it picks up the default values & Java program will launch the default FireFox profile. Default profile means launching FireFox in the safe mode i.e. without any extensions.
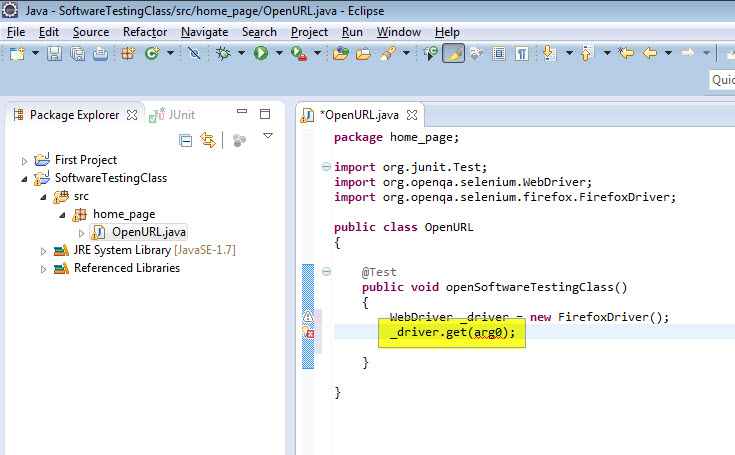
14. Till now we have resolved all errors observed in the code. Now let’s launch new Webpage URL & quit the FireFox browser session.
In selenium to open the new url type “_driver.get”, now you will see new box is opened will seven options. Choose first option shown in below screenshot:

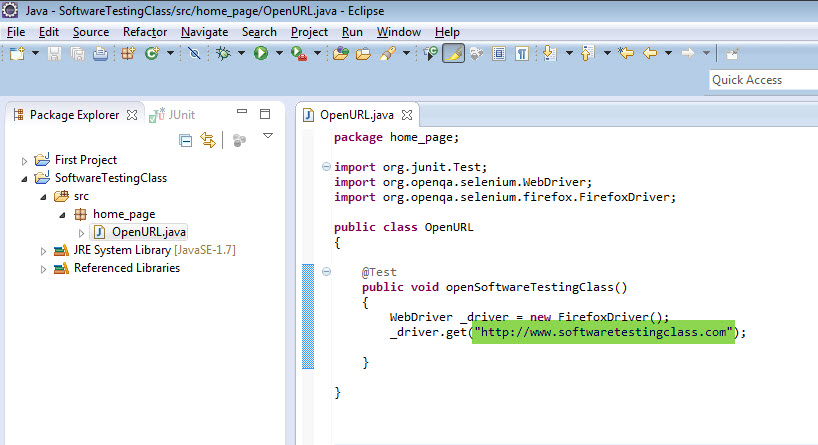
15. Now just replace “arg0” value with “http://www.softwaretestingclass.com” shown in below screen shot:

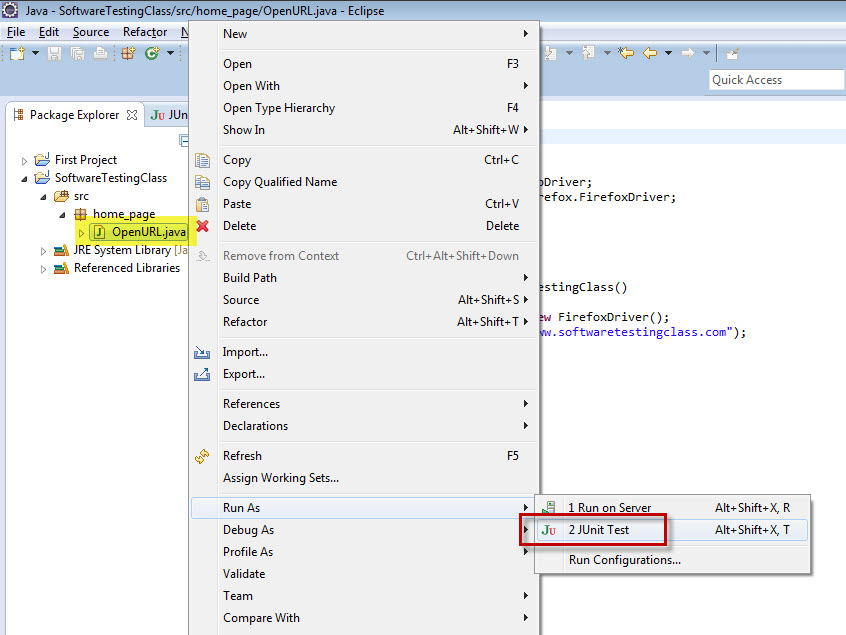
16. Save the Selenium WebDriver Test and Run the Test using JUnit as shown below:

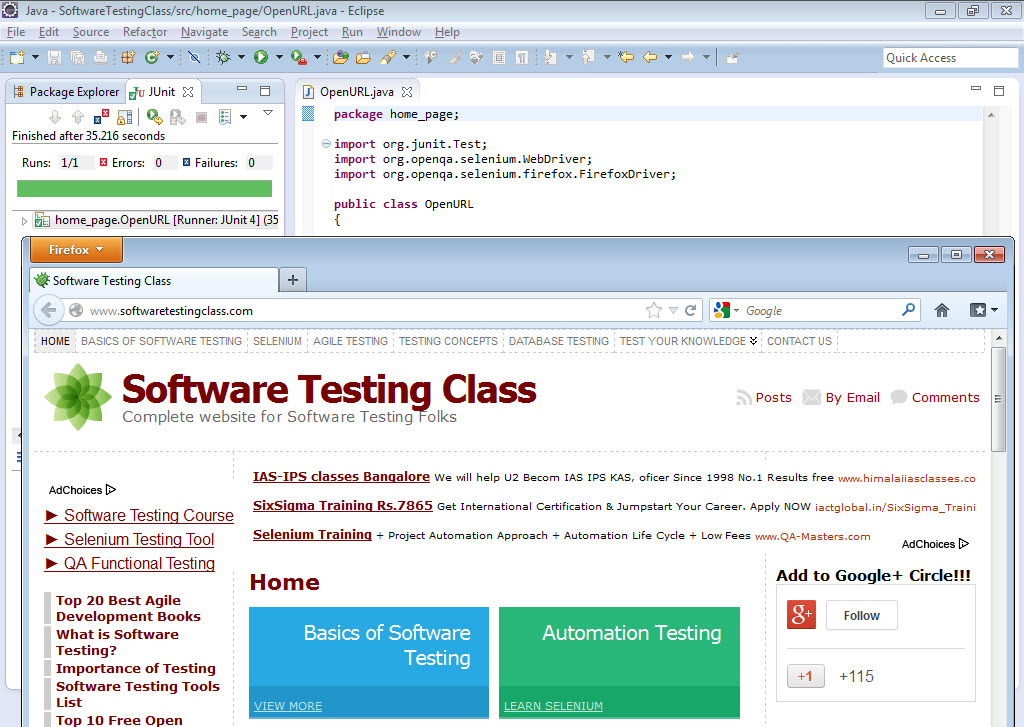
17. New FireFox browser window is open opened & page “http://www.Softwaretestingclass.com” page is opened as shown in below screen shot:

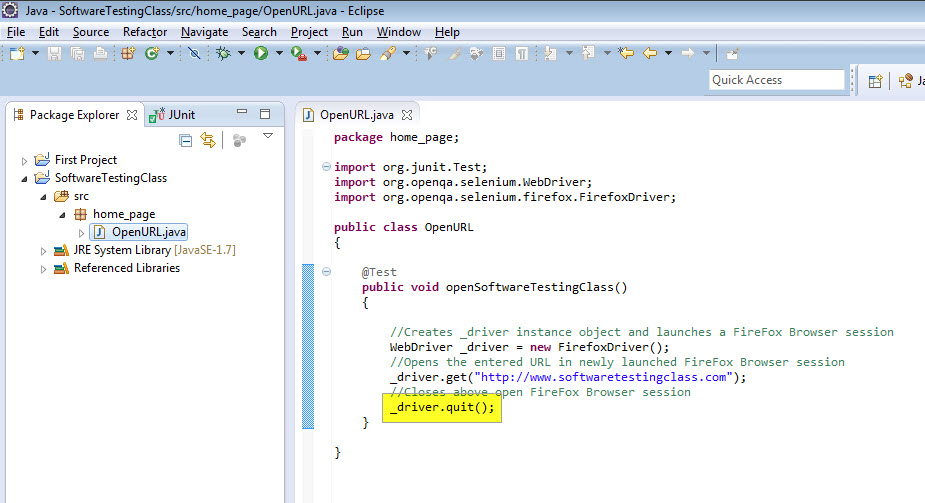
18. Now we will add next command _driver.quit( );to close the session of the FireFox Browser as shown blow:

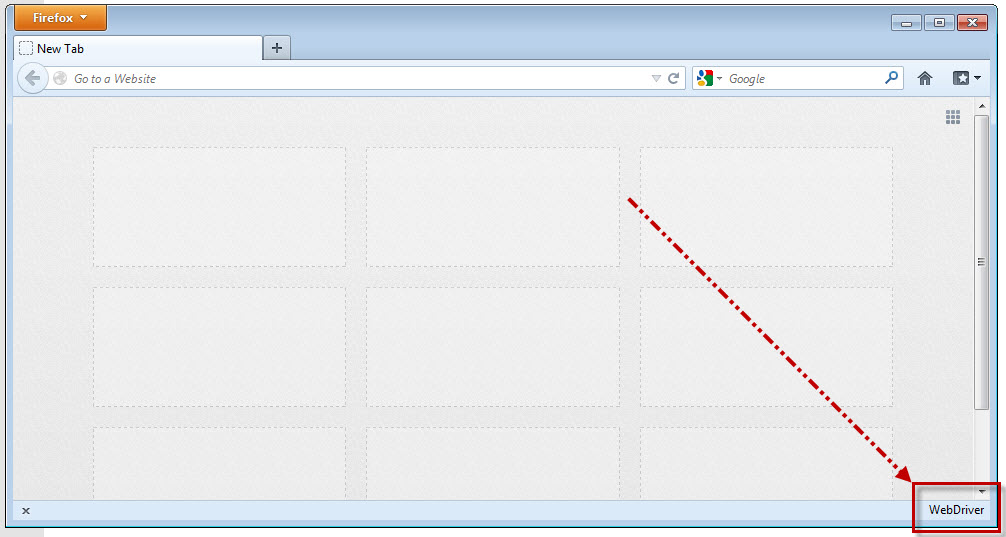
19. Before conclude this post I want explain few things. Once the new session of FireFox Browser is opened while executing the Selenium WebDriver script, then “WebDriver” text is displayed in red color at bottom right side of the browser.

20. Once the test execution is completed, “WebDriver” text color is changes to black as shown in below:

1. Launch Eclipse IDE & create a new Java Project called “SoftwareTestingClass” (To create new Java Project refer post “How to Create Project in Eclipse IDE?”)@@Link Color@@:
2. Inside newly created project, create New Package called “home_page” shown in below screenshot:

3. Under newly created Package, create New Class called “OpenURL” shown in below screenshot. The new class is displayed as “OpenURL.java”.
4. Once you created class on right side of above image you will the class name is displayed in the code editor. Now within “OpenURL” class create one new method called “openSoftwareTestingClass()” as shown below:
5. Add “@Test” annotation above method name “openSoftwareTestingClass()”. Once you add this annotation you will display error showing as below screen shot:
6. To resolve this annotation error we have to hover mouse over “@Test” & click on option “Import ‘Test’ (org.junit)” link shown below screenshot:
7. Once you executed above statement, the new import statement called “import org.junit.Test;” will be added in your code shown in below screenshot. Here we have imported pre-defined “Test” class from JUnit framework.
8. To execute test script in Selenium WebDriver we have to specify the web browser on which we have to execute the test script. So here we have created new Object to connect specified browser while executing our test script. In this script we have selected FireFox Browser. (Selenium WebDriver supports different browser like Chrome, Safari etc. based on your requirement you can use the browser in your test script.)
9. Now you will see two error in the newly added line above screenshot. In previous step we have imported predefined class from “WebDriver” from “open.openqa.selenium” package into our “SoftwareTestingClass” Class.
To resolve this error we have to hover mouse over ‘WebDriver’ & click on option “Import ‘WebDriver’ (org.openqa.selenium)” link shown below screenshot:
Make sure that once you imported WebDriver the first error is resolved & new import statement is added in the head of the code.
10. Similarly to resolve above second error we have to import predefined class “FirefoxDriver” from “open.openqa.selenium.firefox” package into our “SoftwareTestingClass” Class.
11. Ensure that new Import statement of FirefoxDriver is added in head of the code & all errors are resolved. now inbuilt FirefoxDriver Class functionality can be used in our “SoftwareTestingClass” Class.
12. Now I know you have question in mind where these line come from & what is exact meaning of this lines. So before going forward lets discuss meaning of each below statement one by one:
WebDriver _driver = new FirefoxDriver( );
- WebDriver: It is a predefined imported Class from “open.openqa.selenium”
- _driver: This is name of the new object created, it is _driver id object of WebDriver Class. To identify the objects in the code we have added underscore before the object name. This is not compulsion to add this.
- To create an object of specified class, “new” java keyword is used.
- FirefoxDriver is a predefined Class. FirefoxDriver( ) is a predefined constructor calling statement.
13. Have you observed that in the creation statement of WebDriver object, FirefoxDriver( ) class is used without any parameter. If we do not provide any parameter then it picks up the default values & Java program will launch the default FireFox profile. Default profile means launching FireFox in the safe mode i.e. without any extensions.
14. Till now we have resolved all errors observed in the code. Now let’s launch new Webpage URL & quit the FireFox browser session.
In selenium to open the new url type “_driver.get”, now you will see new box is opened will seven options. Choose first option shown in below screenshot:
15. Now just replace “arg0” value with “http://www.softwaretestingclass.com” shown in below screen shot:
16. Save the Selenium WebDriver Test and Run the Test using JUnit as shown below:
17. New FireFox browser window is open opened & page “http://www.Softwaretestingclass.com” page is opened as shown in below screen shot:
18. Now we will add next command _driver.quit( );to close the session of the FireFox Browser as shown blow:
19. Before conclude this post I want explain few things. Once the new session of FireFox Browser is opened while executing the Selenium WebDriver script, then “WebDriver” text is displayed in red color at bottom right side of the browser.

20. Once the test execution is completed, “WebDriver” text color is changes to black as shown in below:
No comments:
Post a Comment