In this article we are concentrating on implementation of the WebDriver, we will see how to selenium webdriver download and configure the Selenium Webdriver with Eclipse & run your first selenium web driver script.
Selenium WebDriver installation is divided in to simple steps to get & learn how to Install & configure WebDriver to kick of your automation testing. Also we will run your first automation script using WebDriver.
Step 1) Download & Install Java on your Computer
Before start working with the Learn Selenium WebDriver, we will need the first download Java Development Kit (JDK).Here you can download Java Development Kit (JDK).
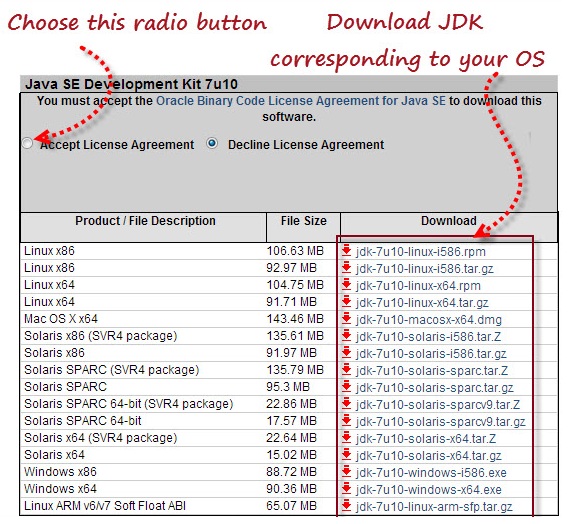
Download Java Development Kit (JDK)
Eclipse is open source software development environment written in Java. It supports supports multiple languages. In this tutorial we will using Eclipse to write the code in Java & execute your first test script.
Here you can download “Eclipse IDE for Java Developers”
Make sure that you are downloading correct version of Eclipse based on the Windows 32 or 64 bit version.

Download “Eclipse IDE” for Java Developers
Once you successfully download the ZIP file, extract the ZIP file in your PC.
For Eclipse, you do not need any installation; just double click on “eclipse.exe” file in the extracted ZIP folder.
Step 3) Download Selenium Java Client Driver
Selenium client driver is available in the different languages like Java, C#, Ruby, Python etc. But in this article we are concentrating on Java language.Here you can download “Selenium Java Client Driver”

Download “Selenium Java Client Driver”
Once you successfully download the ZIP file, extract the ZIP file in your PC in the directory “C:\selenium- java-2.31.0”. You will see JARs files in extracted folder which would be imported in to Eclipse before running our first Selenium WebDriver script.
Step 4) Configure Eclipse with Selenium WebDriver
In Step 2 we have installed Eclipse, just Launch the “eclipse.exe” file from the extracted Eclipse folder.Once you open the “eclipse.exe” file then it will ask you to select the workspace, here you can select the path where you want to save Eclipse project.
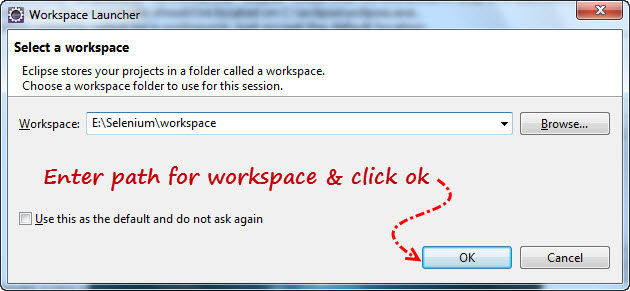
Selenium WebDriver workspace in eclipse
- Go to File menu > New > Java Project.
- Enter Project Name as “Selenium_webdriver_project”
- Click on Finish button.
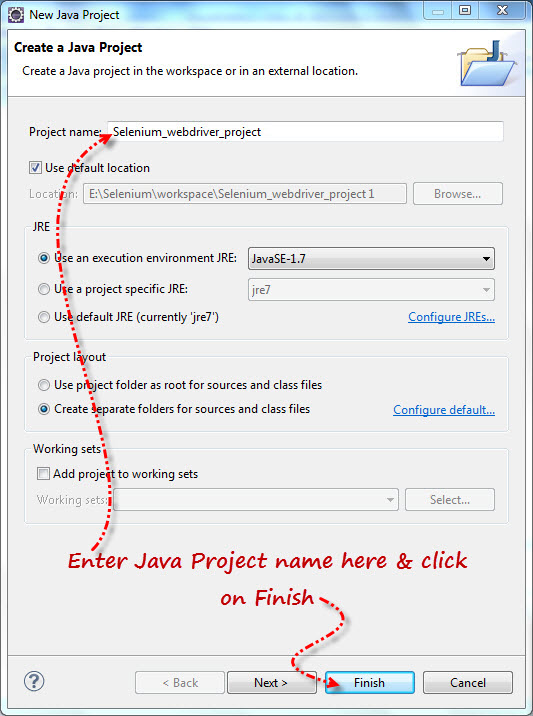
Create Java Project – Selenium WebDriver
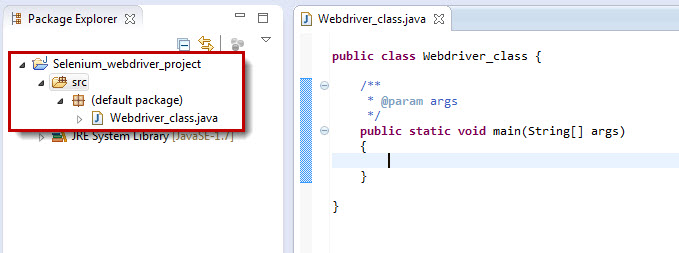
- Under newly created project “Selenium_webdriver_project” you will see the “src“ folder & right click on the “src” folder & create the new class as “Webdriver_class”.
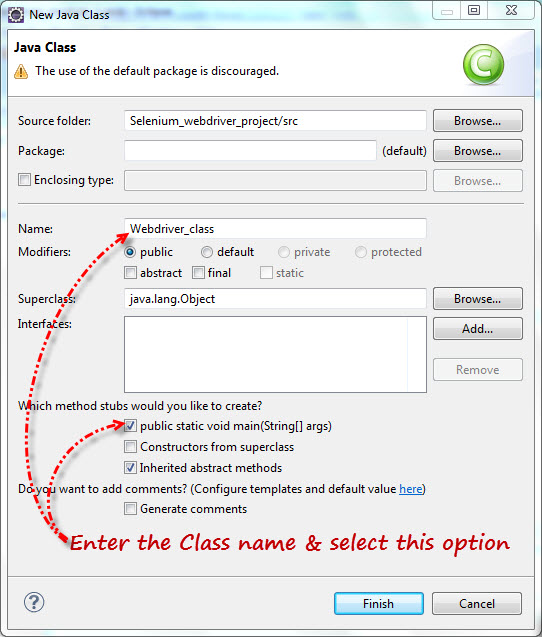
Create Java Class – Selenium WebDriver
Start with Eclipse
- Right click on “Selenium_webdriver_project” & select Properties option.
- Select “Java Build Path” option in the left side of the Properties dialog box.
- Click on Libraries tab
- Click on “Add External JARs..” button.
- Select the extracted Selenium Java Client Driver folder downloaded in Step3 & add all JAR files present in the inside & outside of the “libs” folder. Once you select these JAR files then your properties folder will look like as below.
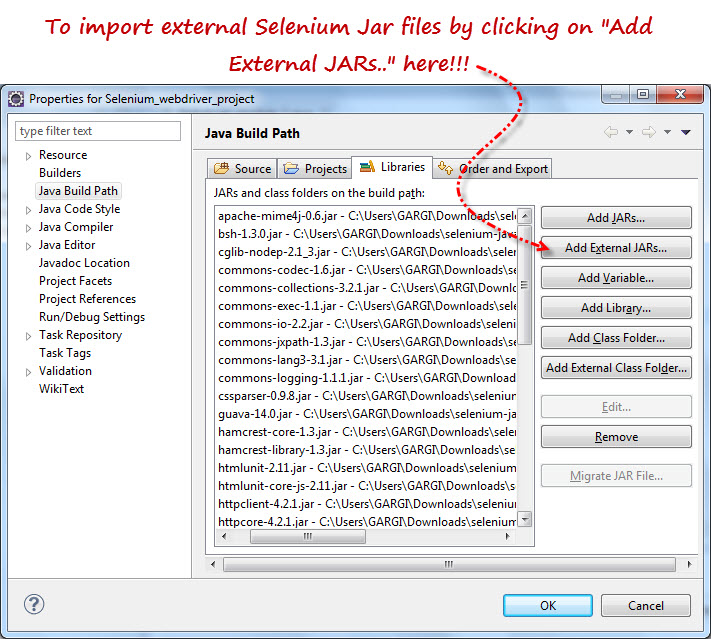
Import External- Selenium Client JAR Files
- Click on OK in the Properties dialog box to import.
Step 5) Run your first Selenium WebDriver script.
Once you complete the Step 1 to Step 4 then you are ready to execute your first WebDriver script. You can just copy paste the code written below & click on Run button to execute your first script. Code below which is written to opens the new Firefox browser window & open the Google page in it. It also read the Title of the page & close the browser window.01 | //Run yout First Selenium WebDriver script by copy paste below code after executing above five simple steps. |
02 |
03 | import org.openqa.selenium.WebDriver; |
04 | import org.openqa.selenium.firefox.FirefoxDriver; |
05 |
06 | public class Webdriver_class |
07 | { |
08 | public static void main(String[] args) |
09 | { |
10 | WebDriver driver = new FirefoxDriver(); |
11 | driver.get("http://google.com"); |
12 | System.out.println(driver.getTitle()); |
13 | driver.close(); |
14 | } |
15 | } |
No comments:
Post a Comment