Capture Screenshot of Web Page In Selenium WebDriver
Most of the time we think to Capture Screenshot in WebDriver
when some kind of error or exception surfaces while practicing testing,
to resolve the same WebDriver has provided us one interface
TakesScreenshot for capturing the screenshot of web application and This
interface provides one method names as getScreenshotAs() to capture screenshot in instance of driver. This getScreenshotAs() method takes argument of type OutputType.File or OutputType.BASE64 or Output.BYTES. So that it could return captured screenshot in File type, or Base 64 string type or in raw bytes.
So this would look like this
For File type
File scrnshot= ((TakesScreenshot)driver).getScreenshotAs(OutputType.FILE);
So this would look like this
For File type
File scrnshot= ((TakesScreenshot)driver).getScreenshotAs(OutputType.FILE);
For Base64 string above code would be like
((TakesScreenshot)driver).getScreenshotAs(OutputType.BASE64);
((TakesScreenshot)driver).getScreenshotAs(OutputType.BASE64);
For BYTES
((TakesScreenshot)driver).getScreenshotAs(OutputType.BYTES);
((TakesScreenshot)driver).getScreenshotAs(OutputType.BYTES);
We have taken the screenshot with the
help of getScreenshotsAs() method and and now its time to copy this
file somewhere in our file system or in our desktop. So for this purpose
we further use copyFile() method of the FileUtils class from the org.apache.commons.io.FileUtils class.
Placing file in file system by using this line
FileUtils.copyFile(scrFile, new File(“e:\main_page.png”));
As I have told you that copyFile is a
method of Class FileUtils and to call this method we need to write
class.method() and in above code copyFile is taking argument from
getScreenShotsAs() and new location where we want to save this captured
Screenshot with name and with extension.
Now we would use write small running
code that would open Google page and it would take a snap shot and that
snap shot would be saved as google.png in my e: driver. One thing we
need to remember whenever we work with File system or java.io then chances of exception is more so we would use try and catch in our code.
import java.io.File;

import org.apache.commons.io.FileUtils;

import org.openqa.selenium.OutputType;

import org.openqa.selenium.TakesScreenshot;

import org.openqa.selenium.WebDriver;

import org.openqa.selenium.firefox.FirefoxDriver;

import org.testng.annotations.AfterTest;

import org.testng.annotations.BeforeMethod;

import org.testng.annotations.Test;

public class Chrome {

WebDriver driver;

@BeforeMethod

public void launchChrome()

{

System.setProperty("webdriver.chrome.driver", "E:\DD MISHRA\workspace\chromedriver_win_26.0.1383.0\chromedriver.exe");

driver = new FirefoxDriver();

driver.get("http://google.co.in");

}

@Test

public void googleScreenshot()

{

try {

File scrnsht =

((TakesScreenshot)driver).getScreenshotAs(OutputType.FILE);

FileUtils.copyFile(scrnsht, new

File("e:\google_page.png"));

} catch (Exception e) {

e.printStackTrace();

}

}

@AfterTest

public void kill()

{

driver.close();

}

}
Check if an element exists using WebDriver
IF you are a Selenium WebDriver Automation tester than most probably
you would have gone through this situation, In which you have faced one
exception that speaks “Element not found”.
So why not, we get together and find first whether element is on page or not and than we perform the action on it.
Case 1:
Why not use implicit wait or explicit wait before the line of code that find the element for specific action. There might be possbility like element has not be loaded in to DOM and due to this exception is coming
Case 2: If Case 1: is not able to handle your problem than why not we use this line of code
Int i=driver.findElement(By.xapth(“your xpath”)).size();
if(i>0)
{
System.out.println(“Finally we got the element and now do the action on it”);
}
Case 3: If you are using ChromeDriver and trying to click on certain button than
try the same code on Firefox because Chrome Driver throw an exception that speaks like Element is not present at location with the co-ordinates
Case 4:
Why not we use isDisplayed() method first in If condition like this
if(dirver.findElement(By.id(“Id of Element”)).isDisplayed())
{ //now perform the action on this element
}
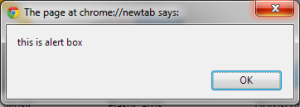
Handling JavaScript Alert in WebDriver
Handling JavaScript Alert is big question if you have just started
learning WebDriver. Because we always get multiple pop-ups some time we
get information about validity of input and some time these pop-up
speaks about error, and also about response.
But as a tester we need to verify the alert message and for the same we need to handle the Alert pop up. So its time to celebrate because WebDriver have provided us with Alert class to deal with JavaScript Alert.
 Since
I have created this alert through a basic html file and it has one
button Ok. Butthere is another kind of alert known as Confirm Box Alert
and it normally have two button
Since
I have created this alert through a basic html file and it has one
button Ok. Butthere is another kind of alert known as Confirm Box Alert
and it normally have two button
1-Ok button
2- Cancel button
Since both alert is handled in the same way so here I am taking the Confirm Box Alert here
Scenario : Suppose we have one button, and once we hit on the button a alert appears with two button Ok and Cancel
a) In first case if end user click on Ok button
So above code would remain same only thing that would change in above script is
But as a tester we need to verify the alert message and for the same we need to handle the Alert pop up. So its time to celebrate because WebDriver have provided us with Alert class to deal with JavaScript Alert.
 Since
I have created this alert through a basic html file and it has one
button Ok. Butthere is another kind of alert known as Confirm Box Alert
and it normally have two button
Since
I have created this alert through a basic html file and it has one
button Ok. Butthere is another kind of alert known as Confirm Box Alert
and it normally have two button1-Ok button
2- Cancel button
Since both alert is handled in the same way so here I am taking the Confirm Box Alert here
Scenario : Suppose we have one button, and once we hit on the button a alert appears with two button Ok and Cancel
a) In first case if end user click on Ok button
@Test
public void testAlertOk()
{
//Now we would click on AlertButton
WebElement button = driver.findElement(By.id("AlerButton"));
button.click();
try {
//Now once we hit AlertButton we get the alert
Alert alert = driver.switchTo().alert();
//Text displayed on Alert using getText() method of Alert class
String AlertText = alert.getText();
//accept() method of Alert Class is used for ok button
alert.accept();
//Verify Alert displayed correct message to user
assertEquals("this is alert box",AlertText);
} catch (Exception e) {
e.printStackTrace();
}
}
b) In second case we want to click on Cancel buttonSo above code would remain same only thing that would change in above script is
alert.accept();For clicking on Cancel we need to use dismiss() method of Alert Class
alert.dismiss();
No comments:
Post a Comment