Configuring Android WebDriver in Eclipse
Configuring AndroidDriver in Eclipse
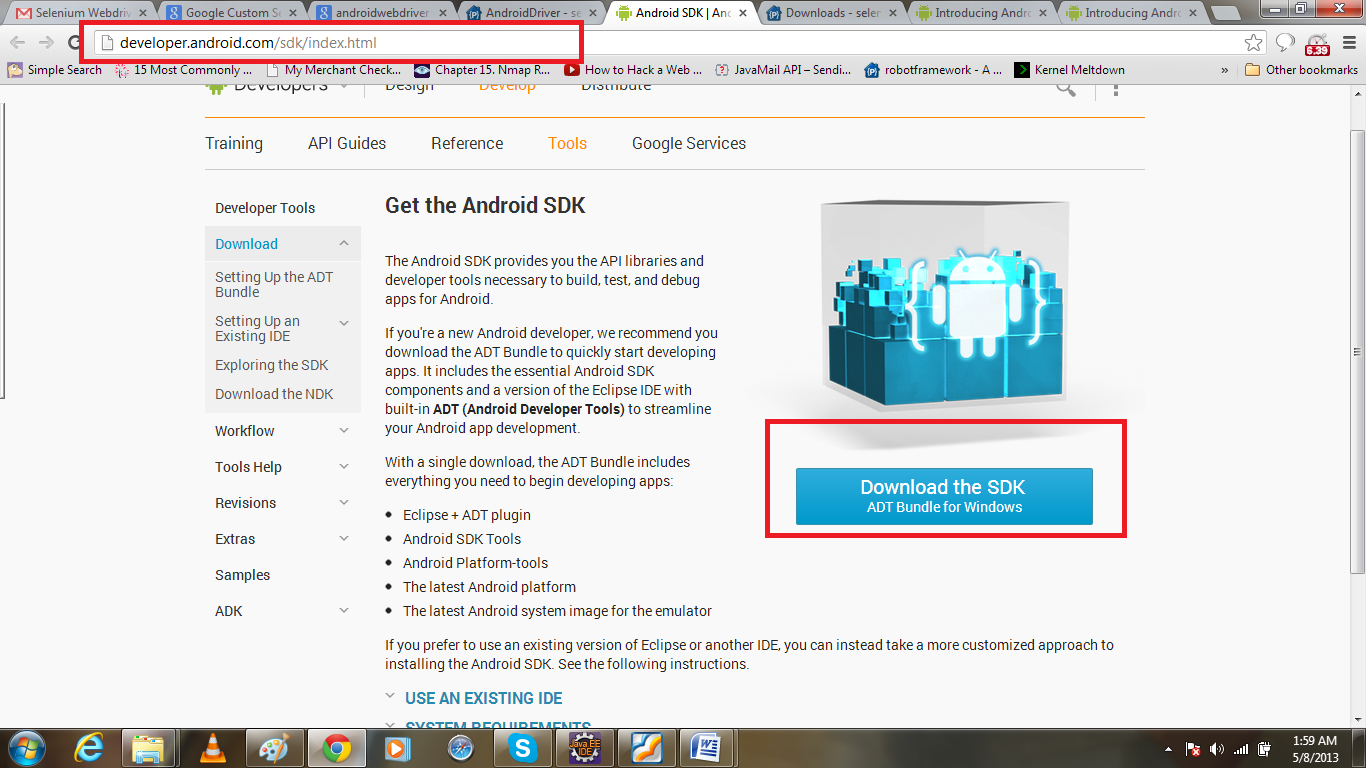
http://developer.android.com/sdk/index.html
3- Unzip it in some location like C:/SDK
4- You will see three folder ther
Here you can use the eclise from here and so no need to configure here in eclipse it is already there in eclipse
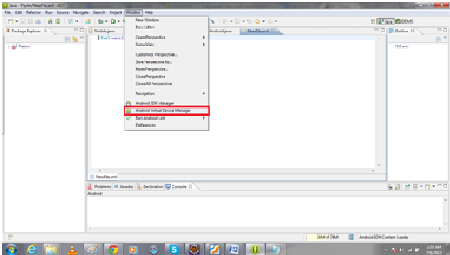
Now you need to Create Android Virtual Device
Go to Window >>AVD Manager>>
or
5- Avd can also be created by command line
But for that you need to reach to the directory path of <sdk> tools
so open you Command prompt write this line (as my tools is present at this location)
cd C:androidadt-bundle-windows-x86sdktools
now write this line
android create avd -n my_android -t 14 -c 512M
Here -n stands for specification of the avd name
-t is used here for It specifies the platform target. Use the android list targets command to get the list of platforms available with the SDK.
-c targets to SD card in mobile
6- Lauching emulator
write this command in CMD
adb devices By default it will give id like this emulator-5554
8- Now copy your androidDriver apk and place it in platform-tools folder
9- Now installing the apk in newly created AVD(assuming that we are in platform-tools directory in cmd)
adb -s emulator-5554 -e install -r android-server-2.21.0.apk
10- Starting Android-server (assuming we are in platform-tools directory on CMD)
adb -s emulator-5554 shell am start -a android.intent.action.MAIN -n org.openqa.selenium.android.app/.MainActivity -e debug true
11- Setting up the port forwarding in order to forward traffic or script injection from local machine to emulator
adb -s emulator-5554 forward tcp:8080 tcp:808
But if you want to install plug-in of Android WebDriver in to your eclipse
Steps:
1- Go to Help>> Install new software >> Add
https://dl-ssl.google.com/android/eclipse/
and Follow the instruction and finally you would be able to configure the Android WebDriver plugin in Eclipse.
1- Download Android server apk from this URL https://code.google.com/p/selenium/downloads/list
2- Download android SDK from this location
http://developer.android.com/sdk/index.html
3- Unzip it in some location like C:/SDK
4- You will see three folder ther
- Eclipse
- SDK Manager.exe
- sdk

Here you can use the eclise from here and so no need to configure here in eclipse it is already there in eclipse
Now you need to Create Android Virtual Device
Go to Window >>AVD Manager>>
or
5- Avd can also be created by command line
But for that you need to reach to the directory path of <sdk> tools
so open you Command prompt write this line (as my tools is present at this location)
cd C:androidadt-bundle-windows-x86sdktools
now write this line
android create avd -n my_android -t 14 -c 512M
Here -n stands for specification of the avd name
-t is used here for It specifies the platform target. Use the android list targets command to get the list of platforms available with the SDK.
-c targets to SD card in mobile
6- Lauching emulator
- a. By using command line (navigate to platform tool location)emulator -avd my_android &
- b. By using manually
Window >>Android Virtual Device Manager >> select already created AVD and click on start
write this command in CMD
adb devices By default it will give id like this emulator-5554
8- Now copy your androidDriver apk and place it in platform-tools folder
9- Now installing the apk in newly created AVD(assuming that we are in platform-tools directory in cmd)
adb -s emulator-5554 -e install -r android-server-2.21.0.apk
10- Starting Android-server (assuming we are in platform-tools directory on CMD)
adb -s emulator-5554 shell am start -a android.intent.action.MAIN -n org.openqa.selenium.android.app/.MainActivity -e debug true
11- Setting up the port forwarding in order to forward traffic or script injection from local machine to emulator
adb -s emulator-5554 forward tcp:8080 tcp:808
But if you want to install plug-in of Android WebDriver in to your eclipse
Steps:
1- Go to Help>> Install new software >> Add
https://dl-ssl.google.com/android/eclipse/
and Follow the instruction and finally you would be able to configure the Android WebDriver plugin in Eclipse.
Downloading and Configuring Selenium Webdriver in Eclipse with Testng plugin installation
Downloading and Configuring Selenium WebDriver in Eclipse
Steps:
Configuring TestNG in Eclipse
Steps:
- To Download Selenium WebDriver jar file Go to http://seleniumhq.org/download/
- Now Click on 2.30 under the label Selenium Server (formerly the Selenium RC Server)
- Now Open Eclipse and Create one Java project

- Right Click on Left hand side in Eclipse under Package Explorer like in Image
- Select NEW|JAVA PROJECT as marked in Image
- Enter the name of Project Here I have mentioned New Project and Click on Finish button
- Go to Project Explorer Label and See new project has been created as in Image
- Now Select you project and Select NEW|Folder as in Image
- Another Window Open Enter the name of Folder and Click on Finish as in Image
- Now go to Location where Java Client has been downloaded and Copy the Selenium Server
- Copy Selenium Server Standalone jar in Lib folder created under NewProject
- Now add this standalone file in to path by doing Right Click on Selenium Server Standalone 2.24.jar – Go to Build path|Add to Build Path as in image
- Now you would see a new Label named as Reference Library as in Image
- By adding Selenium Server Standalone 2.24.jar we have configured Webdriver in Eclipse


Configuring TestNG in Eclipse

- In Eclipse go to Help|Install New Software
- Enter http://beust.com/eclipse in
the field as displayed in the image below and Click on Add Button on
the right side of this text field, A pop up will appear, Enter the name
TestNG and click on ok button and wait for few second. After this wait
you See TestNg and Select check box of TestNg and then click on Next
and Follow the Instruction and finally click on Finish and Refresh
Eclipse.
- Note : In between installation one pop alert will appear before you that will ask your permission to install testng since it is not trusted, In this click on Ok button..wait for installation of Testng
- Question arises how we know that TestNg has been configured in Eclipse
Steps


- Go to Window | Show View | Other as in Image
- Now Select Java|TestNG|GO
- Finally to see whether Eclipse is configured or not do a final touch Right Click on you Peoject|Run As|TestNg Test as in Image


Installing Maven Plugin in Eclipse
Installing Maven plugin in Eclipse
1- Download Eclipse
http://www.eclipse.org/downloads/
2- Unzip and Click on Eclipse.exe
3- Now in Eclipse Click Help-> Install New Software
4- Type the following URL in field Work with: http://download.eclipse.org/technology/m2e/releases
5- Click Add
6- Give any name for the repository
7- Click OK
8- Select the checkbox Maven Integration for Eclipse
9- Click Next etc. to move forward and choose to restart Eclipse when prompted
1- Download Eclipse
http://www.eclipse.org/downloads/
2- Unzip and Click on Eclipse.exe
3- Now in Eclipse Click Help-> Install New Software
4- Type the following URL in field Work with: http://download.eclipse.org/technology/m2e/releases
6- Give any name for the repository
7- Click OK
8- Select the checkbox Maven Integration for Eclipse
9- Click Next etc. to move forward and choose to restart Eclipse when prompted
Creating First Maven Project in Eclipse
Here i am posting new post to create new maven project that i have
learned from various sites and blot and i got this very useful and want
to share this with people who are also like me, and has started
learning Selenium from scratches.
1- In Eclipse File ->New-> Other-> Maven-> Maven Project
2- Now Click Next, Next and Next
3- Type in field Group Id: com.Projectgroup.selenium Example com.Dwarika.selenium
4-Type in field Artifact Id: projectname Example : Webdriver
5-Click: Finish
After this you will see the hierarchical structure like this in Eclipse where you would be able to see pom.xml in which you put all dependencies for your Maven Project
In Above snap number 4 you would be able to see the dependencies for junit and Slenenium
Dependencies that we need to change as per the use
1) We will change junit version to 4.7 or recent one is 4.9
in my case i have taken version for junit is 4.7
<dependency>
  <groupId>junit</groupId>
  <artifactId>junit</artifactId>
  <version>4.9</version>
  <scope>test</scope>
</dependency>
To add dependecy for Selenium we need to put this like given below
  org.seleniumhq.selenium
  selenium-java
  2.6.0

-- Here Eclipse will detect changes in pom.xml automatically and will download or update all dependencies as per the requirement
-- After the build is finished, there should be selenium*.jar files under Maven Depe
No comments:
Post a Comment