Selenium Introduction
Selenium as Automation Tool
Since More and more cloud based and browser based web applications are being developed and we people are following agile methodology for the development of product so need of quick testing appears as a big question mark before tester and they need some tool through which they can automate their product/web-application with ease. At this point of time some automation tool comes in to mind like QTP,Selenium etc. Then again one more question appears before tester/project managers and various stack-holder, which tool to choose – finally the only thing that comes which one is open source and here Selenium automation framework kill all other automation tool for browser automation.So why Selenium
1- Selenium is open source software released under Apache 2.0 License and due to this, it could be downloaded, could be used without any charge and anyone can do enhancement for its own ease of executing test.2- Selenium is a framework that could be easily used with the help of any IDE tool like Eclipse
3- Selenium supports many browser and have capability to run on various system at the same time so it also saves time for compatibility testing (through Selenium Grid and with the help of xml used with testng )
4- Selenium core is developed mainly in JavaScript and has various API to interact with web-application with in Browser(Selenium RC) and also from outside Browser(Selenium WebDriver).
5- Selenium is mainly used for functional and System testing of Web-application and some time tests written for function testing also used in Acceptance and integration tests
6- Selenium also provides Record/Playback option (Selenium IDE) tools that could be used without knowing any scripting language
7- Selenium provide a domain specific language (selenese) to write tests in number of popular programming language like
- Java
- C#
- Php
- Groovy
- Perl
- Python
9-Selenium has borrowed Xpath to identify Element on web-application from XML through which user can navigate forward and backward with same ease in identifying element, It also provides locator(mainly for SeleniumIDE, RC and WebDriver )
- By ID
- By Name
- By Link
- By Xpath
- By CSS
- By DOM
10- Selenium (Webdriver) provides resources for Iphone and Android testing.
XPath in Automation mainly in Selenium
When a tester starts automating script for certain application and webpage the most tedious job that he faced is the location of each object/Element that he uses in his automation script. Identification of object/element is divided mainly in three parts1) Location based Identification
2) Cell based Identification
3) Property based identification
Xpath is one example of Cell based Identification and this is further devided in four part
1) Assess the structure of the application pages and how best to locate a label on the page: Accessing certain structure of a web page is totally dependent on the type of application that we are using. Since we are taking webpage as the application so obliviously we will deal with HTML to access the structure of page
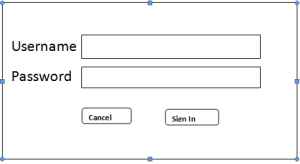
Suppose the html for above page is
<Table>
<tbody>
<tr>
<td>
<span>Username</span></td>
<input id=”hfeb” type=”text”
<span>Password</span></td>
<input id=”hjhflds” type=”text”
</tbody>
<table>
From here we can see that page contains table and labels like Username and Password which is mainly present in span tag without any special property so we can track this label username and password by its text so its
Xpath would be
//span[text()=’Username’]
2) Identify the structural relationship between a label and its associated field: Now we should deal with the relationship with Label and Field and how they are related to each other.
In our case Username and Text field comes in the same row and we are not using any cryptic and dynamic function to handle text field
3) Construction of Xpath to identify the element that we have to use in our Selenium script: Construction of xpath is also divided in 3 parts
- Locating the label
- Using the label to find the parent row element
- Find the desired child field of the row element
Step 1:
//span[text()=’Username’]
This XPath can then be modified to get to the parent row element. To do this, it is important to note that the row (TR) element is not the direct parent of the Span element. The column element represented by the td tag is the direct parent of the Span element. The tr element is the parent of the td element. Therefore, to get to the tr element, we must travel two levels up the parent hierarchy. This can be done with the following statement:
//span[text()=’Username’]/../..
Adding ‘/..’ moves the reference up one level from the SPAN element (the label) to
the SPAN element’s direct parent. Sincethe parent row element (TR), we now need to update the statement to get the child textbox of that row, which is represented in the HTML by the input tag. This is done by modifying the previous XPath statement to appear as follows:
//span[text()=’Username’]/../..//input
Since there is only one input element that is a child of the row element, there is no need to use any properties to further we need to go up two levels, we can do this with ‘/../..’. Once we have access to indentify the input element.
4) Using Xpath in appropriate place in script: Since we are now familiar with the xpath of
Username and password like this
driver.findElement(By.xpath(“//
span[text()=’Username’]/../..//input”))
Few more work out example to learn xpath
Example 1: /AAA
This xpath says : “Select all root AAA
<AAA>
<BBB/>
<CCC/>
<BBB/>
<BBB/>
<DDD>
<BBB/>
</DDD>
<CCC/>
</AAA>
Example 2: /AAA/CCC
This Xpath says : “Select all child CCC of root AAA”
<AAA>
<BBB/>
<CCC/>
<BBB/>
<BBB/>
<DDD>
<BBB/>
</DDD>
<CCC/>
</AAA>
Example 3: /AAA/DDD/BBB
This xpath says “Select all BBB which are children of DDD and which is further children of root AAA”
<AAA>
<BBB/>
<CCC/>
<BBB/>
<BBB/>
<DDD>
<BBB/>
</DDD>
<CCC/>
</AAA>
Example 4:
//BBB
This xpath says “to select all BBB”
<AAA>
<BBB/>
<CCC/>
<BBB/>
<BBB/>
<DDD>
<BBB/>
</DDD>
<CCC/>
</AAA>
Example 5:
//DDD/BBB
This Xpath says “Select all BBB which is the children of DDD
<AAA>
<BBB/>
<CCC/>
<BBB/>
<BBB/>
<DDD>
<BBB/>
</DDD>
<CCC/>
</AAA>
Example 6:
/AAA/DDD/*
This Xpath says “Select all element which are enclosed by /AAA/DDD
Example 7: //*
Select all elements in the HTML file
Example 8: /AAA/BBB[1]
This xpath says “select first Chil BBB of AAA
<AAA>
<BBB>
<BBB>
<BBB>
<BBB>
</AAA>
But to select the last BBB child of AAA
We can write
/AAA/BBB[Last()]
Example 9:
<AAA>
b1″/>
b2″/>
bbb”/>
<BBB/>
</AAA>
//@id
This xpath says: “Select all Id attribute
//BBB[@name]
This xpath says: “select all BBB with attribute “name””
bbb”/>
If we want to select all BBB in above html
Then xpath will be
//BBB[@*]
If we want to select only one BBB that don’t have any attribute in above html then
//BBB[not(@*)]
If we want to select some specific BBB with its attributes value then
//BBB[@name=”bbb”]
Then it will select BBB where value of its attribute is bbb
Then in above HTML
bbb”/>
Find Xpath through Firebug
People who have been dirtying their hand in automation with selenium
would be familiar with the pain of failing test due to wrong element
locator and because they don’t get the right way to find out the Xpaths,
CSS path . Firebug is the solution of all such pain and it also helps
you to speed your automation work.
Oh I am taking much time of yours, Ok then let me start with the steps to find out the Xpaths and CSS path through Firebug of any element on a web page. But let me tell you what Xpath is
Xpath is just the combination of HTML tag that helps in identifying specific element on a webpage.
But before this
1- Firefox should be installed
2- Firebug add-on should be installed. To install Firebug follow this, go to Tool–> Add-ons –> Search Firebug –> Install
Assuming you have installed Firebug and Firefox on your Windows or Mac machine.
Steps for finding Xpath through Firebug
1- Open Firefox browser with its Mozilla home page
2- Click on Bug tab at the right corner of the Browser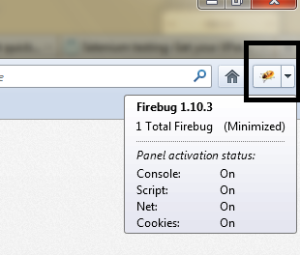
3- Click on Inspect element button and place your tip of cursor on any element for which you want to find Xpath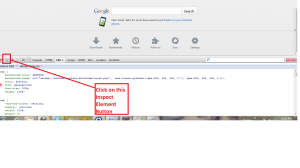
4- Here I have selected the Mozilla logo as soon as we put cursor on Logo and click once on it, HTML tag get highlighted in Firebug
5- Right Click on highlighted code and Select Copy Xpath like this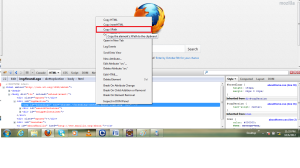
6- Now place this Xpath in to your script.
Oh I am taking much time of yours, Ok then let me start with the steps to find out the Xpaths and CSS path through Firebug of any element on a web page. But let me tell you what Xpath is
Xpath is just the combination of HTML tag that helps in identifying specific element on a webpage.
But before this
1- Firefox should be installed
2- Firebug add-on should be installed. To install Firebug follow this, go to Tool–> Add-ons –> Search Firebug –> Install
Assuming you have installed Firebug and Firefox on your Windows or Mac machine.
Steps for finding Xpath through Firebug
1- Open Firefox browser with its Mozilla home page
2- Click on Bug tab at the right corner of the Browser

3- Click on Inspect element button and place your tip of cursor on any element for which you want to find Xpath

4- Here I have selected the Mozilla logo as soon as we put cursor on Logo and click once on it, HTML tag get highlighted in Firebug
5- Right Click on highlighted code and Select Copy Xpath like this

6- Now place this Xpath in to your script.
Contains() and starts-with() function in Xpath
Contains() and starts-with() function in xpath is used when
we are familiar with partial attributes of an element on HTML pages. Here I am trying to explain how Contains() and starts-with() function are used in writing xpath
Here I am adding one Snap to show how it works
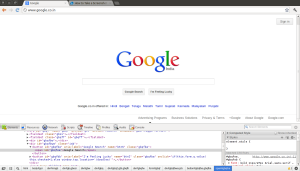
Here as we can see we want to search Google Search just by writing its xpath in console
So to find the Google Search button we have to write xpath like this
Now suppose we want to search Google Search button if we are just familiar that id attributes start with gbqfs
then we have to use function starts-with like this
In the same fashion we can use Contains function to find the Google Search button like this
here I have taken fsa from gbqfsa
Here I am adding one Snap to show how it works

Here as we can see we want to search Google Search just by writing its xpath in console
So to find the Google Search button we have to write xpath like this
$x(“//span[@id='gbqfsa']“)Once we hit enter it would bring
[It shows that xpath for Google Search Button is correctly written
],
- gbqfsa">Google Search
Now suppose we want to search Google Search button if we are just familiar that id attributes start with gbqfs
then we have to use function starts-with like this
$x(“//span[starts-with(@id,'gbqfs')]“)and once when we hit enter on console it would reflect two button one is Google Search and Second one is I’m Feeling Lucky
[So to find out the Google Search uniquely we need to complete id attribute to gbqfsa
,
- gbqfsa">Google Search
]
- <span id="gbqfsb">I'm Feeling Lucky</span>
$x(“//spant[starts-with(@id,'gbqfsa')]“)It proves that we have written right xpath for Google Search
and hit to enter and now it would reflect only
[
],
- <span id="gbqfsa">Google Search</span>
In the same fashion we can use Contains function to find the Google Search button like this
here I have taken fsa from gbqfsa
$x(“//span[contains(@id,'fsa')]“) hit enter and hopefully it will return
[
],
- <span id="gbqfsa">Google Search</span>
No comments:
Post a Comment