- ACCEPT_ALERT = 'acceptAlert'
- ADD_COOKIE = 'addCookie'
- CLEAR_APP_CACHE = 'clearAppCache'
- CLEAR_ELEMENT = 'clearElement'
- CLEAR_LOCAL_STORAGE = 'clearLocalStorage'
- CLEAR_SESSION_STORAGE = 'clearSessionStorage'
- CLICK = 'mouseClick'
- CLICK_ELEMENT = 'clickElement'
- CLOSE = 'close'
- DELETE_ALL_COOKIES = 'deleteAllCookies'
- DELETE_COOKIE = 'deleteCookie'
- DELETE_SESSION = 'deleteSession'
- DISMISS_ALERT = 'dismissAlert'
- DOUBLE_CLICK = 'mouseDoubleClick'
- DOUBLE_TAP = 'touchDoubleTap'
- DRAG_ELEMENT = 'dragElement'
- ELEMENT_EQUALS = 'elementEquals'
- EXECUTE_ASYNC_SCRIPT = 'executeAsyncScript'
- EXECUTE_SCRIPT = 'executeScript'
- EXECUTE_SQL = 'executeSql'
- FIND_CHILD_ELEMENT = 'findChildElement'
- FIND_CHILD_ELEMENTS = 'findChildElements'
- FIND_ELEMENT = 'findElement'
- FIND_ELEMENTS = 'findElements'
- FLICK = 'touchFlick'
- GET = 'get'
- GET_ACTIVE_ELEMENT = 'getActiveElement'
- GET_ALERT_TEXT = 'getAlertText'
- GET_ALL_COOKIES = 'getCookies'
- GET_APP_CACHE = 'getAppCache'
- GET_APP_CACHE_STATUS = 'getAppCacheStatus'
- GET_COOKIE = 'getCookie'
- GET_CURRENT_URL = 'getCurrentUrl'
- GET_CURRENT_WINDOW_HANDLE = 'getCurrentWindowHandle'
- GET_ELEMENT_ATTRIBUTE = 'getElementAttribute'
- GET_ELEMENT_LOCATION = 'getElementLocation'
- GET_ELEMENT_LOCATION_ONCE_SCROLLED_INTO_VIEW = 'getElementLocationOnceScrolledIntoView'
- GET_ELEMENT_SIZE = 'getElementSize'
- GET_ELEMENT_TAG_NAME = 'getElementTagName'
- GET_ELEMENT_TEXT = 'getElementText'
- GET_ELEMENT_VALUE = 'getElementValue'
- GET_ELEMENT_VALUE_OF_CSS_PROPERTY = 'getElementValueOfCssProperty'
- GET_LOCAL_STORAGE_ITEM = 'getLocalStorageItem'
- GET_LOCAL_STORAGE_KEYS = 'getLocalStorageKeys'
- GET_LOCAL_STORAGE_SIZE = 'getLocalStorageSize'
- GET_LOCATION = 'getLocation'
- GET_PAGE_SOURCE = 'getPageSource'
- GET_SCREEN_ORIENTATION = 'getScreenOrientation'
- GET_SESSION_STORAGE_ITEM = 'getSessionStorageItem'
- GET_SESSION_STORAGE_KEYS = 'getSessionStorageKeys'
- GET_SESSION_STORAGE_SIZE = 'getSessionStorageSize'
- GET_SPEED = 'getSpeed'
- GET_TITLE = 'getTitle'
- GET_WINDOW_HANDLES = 'getWindowHandles'
- GET_WINDOW_POSITION = 'getWindowPosition'
- GET_WINDOW_SIZE = 'getWindowSize'
- GO_BACK = 'goBack'
- GO_FORWARD = 'goForward'
- HOVER_OVER_ELEMENT = 'hoverOverElement'
- IMPLICIT_WAIT = 'implicitlyWait'
- IS_BROWSER_ONLINE = 'isBrowserOnline'
- IS_BROWSER_VISIBLE = 'isBrowserVisible'
- IS_ELEMENT_DISPLAYED = 'isElementDisplayed'
- IS_ELEMENT_ENABLED = 'isElementEnabled'
- IS_ELEMENT_SELECTED = 'isElementSelected'
- LONG_PRESS = 'touchLongPress'
- MAXIMIZE_WINDOW = 'windowMaximize'
- MOUSE_DOWN = 'mouseButtonDown'
- MOUSE_UP = 'mouseButtonUp'
- MOVE_TO = 'mouseMoveTo'
- NEW_SESSION = 'newSession'
- QUIT = 'quit'
- REFRESH = 'refresh'
- REMOVE_LOCAL_STORAGE_ITEM = 'removeLocalStorageItem'
- REMOVE_SESSION_STORAGE_ITEM = 'removeSessionStorageItem'
- SCREENSHOT = 'screenshot'
- SEND_KEYS_TO_ACTIVE_ELEMENT = 'sendKeysToActiveElement'
- SEND_KEYS_TO_ELEMENT = 'sendKeysToElement'
- SET_ALERT_VALUE = 'setAlertValue'
- SET_BROWSER_ONLINE = 'setBrowserOnline'
- SET_BROWSER_VISIBLE = 'setBrowserVisible'
- SET_ELEMENT_SELECTED = 'setElementSelected'
- SET_LOCAL_STORAGE_ITEM = 'setLocalStorageItem'
- SET_LOCATION = 'setLocation'
- SET_SCREEN_ORIENTATION = 'setScreenOrientation'
- SET_SCRIPT_TIMEOUT = 'setScriptTimeout'
- SET_SESSION_STORAGE_ITEM = 'setSessionStorageItem'
- SET_SPEED = 'setSpeed'
- SET_TIMEOUTS = 'setTimeouts'
- SET_WINDOW_POSITION = 'setWindowPosition'
- SET_WINDOW_SIZE = 'setWindowSize'
- SINGLE_TAP = 'touchSingleTap'
- SUBMIT_ELEMENT = 'submitElement'
- SWITCH_TO_FRAME = 'switchToFrame'
- SWITCH_TO_WINDOW = 'switchToWindow'
- TOGGLE_ELEMENT = 'toggleElement'
- TOUCH_DOWN = 'touchDown'
- TOUCH_MOVE = 'touchMove'
- TOUCH_SCROLL = 'touchScroll'
- TOUCH_UP = 'touchUp'
- UPLOAD_FILE = 'uploadFile'
Saturday, January 25, 2014
selenium.webdriver.remote.command
Selenium Web Driver Command List
Commands
driver.get("http://www.google.com"); To open an application
driver.findElement(By.id("passwd-id")); Finding Element using Id
driver.findElement(By.name("passwd")); Finding Element using Name
driver.findElement(By.xpath("//input[@id=’passwd-id’]")); Finding Element using Xpath
element.sendKeys("some text"); To type some data
element.clear(); clear thecontents of a text field or textarea
driver.findElement(By.xpath("//select")); Selecting the value
select.findElements(By.tagName("option")); Selecting the value
select.deselectAll(); This will deselect all OPTIONs from the first SELECT on the page
select.selectByVisibleText("Edam"); select the OPTION withthe displayed text of “Edam”
findElement(By.id("submit")).click(); To click on Any button/Link
driver.switchTo().window("windowName"); Moving from one window to another window
driver.switchTo().frame("frameName"); swing from frame to frame (or into iframes)
driver.switchTo().frame("frameName.0.child"); to access subframes by separating the path with a dot, and you can specify the frame by itsindex too.
driver.switchTo().alert(); Handling Alerts
driver.navigate().to("http://www.example.com"); To Navigate Paeticular URL
driver.navigate().forward(); To Navigate Forward
driver.navigate().back(); To Navigate Backword
driver.close() Closes the current window
driver.quit() Quits the driver and closes every associated window.
driver.switch_to_alert() Switches focus to an alert on the page.
driver.refresh() Refreshes the current page.
driver.implicitly_wait(30) Amount of time to wait
driver.set_script_timeout(30) The amount of time to wait
Commonly Used Selenium Commands
- open
- opens a page using a URL.
- click/clickAndWait
- performs a click operation, and optionally waits for a new page to load.
- verifyTitle/assertTitle
- verifies an expected page title.
- verifyTextPresent
- verifies expected text is somewhere on the page.
- verifyElementPresent
- verifies an expected UI element, as defined by its HTML tag, is present on the page.
- verifyText
- verifies expected text and its corresponding HTML tag are present on the page.
- verifyTable
- verifies a table’s expected contents.
- waitForPageToLoad
- pauses execution until an expected new page loads. Called automatically when clickAndWait is used.
- waitForElementPresent
- pauses execution until an expected UI element, as defined by its HTML tag, is present on the page.
How to integrate a JUnit4 – Webdriver test into JMeter
JMeter is an open source load testing tool, with many capabilities. One of the many interesting things which can be done is to integrate a webdriver test into a JMeter test suite.
Before start make sure that Java and JMeter properly installed, and the webdriver libraries are downloaded. You can download them from the following links:
- Java: http://www.java.com/getjava/
- JMeter: http://jmeter.apache.org/
- Webdriver: http://docs.seleniumhq.org/download/
To create a project:
- Click File -> New- > Java Project
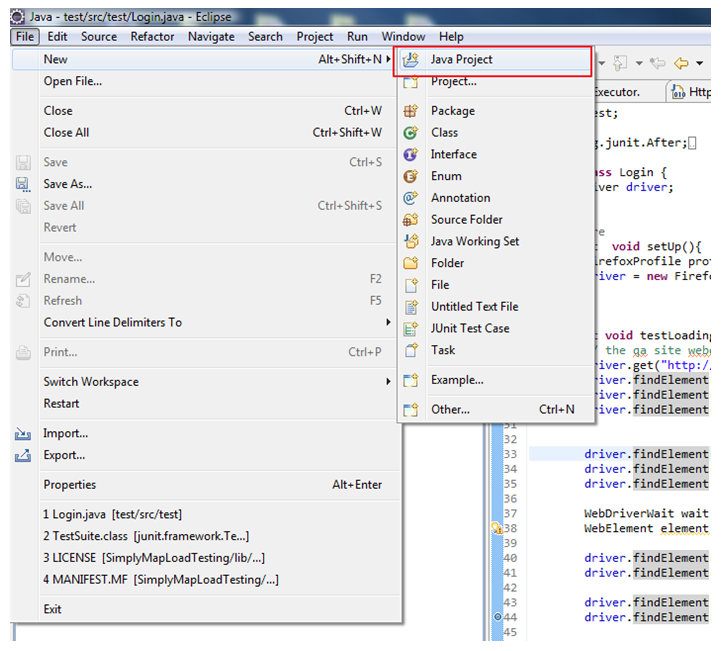
New Java Project
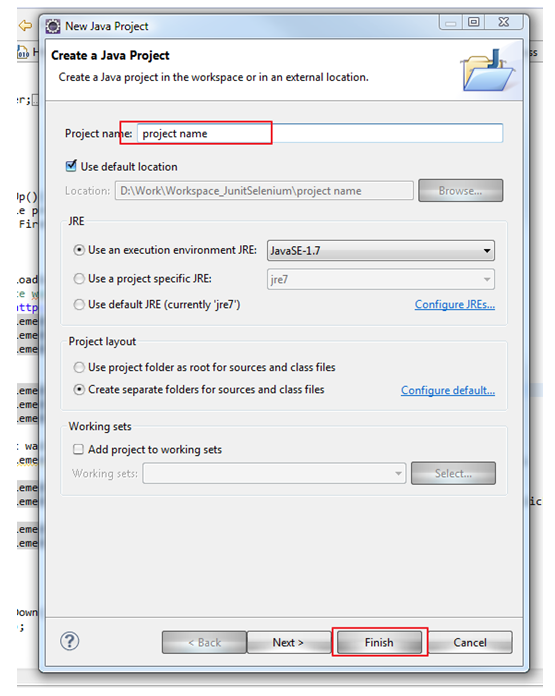
New Java Project Name
Webdriver – XPath and CSS selector performance tip
There are cases when using XPath has some advantages over CSS selectors.
For example if there is a site where we can select an item only by text because the other type of locators are not clear(id’s and classes are generated and they are used in multiple places).
What can we do in this situation?
- Use a CSS locator to select multiple elements and then call the getText() function and compare the results with the selected string
This is a working solution, but Webdriver calls are expensive and it can really slow down test runs in IE8 and IE9 browsers. - Use the XPath’s contains function to select the element by its text value
span[contains(text(),'Text to search for')]
Short background story:
To solve our initial problem using CSS we have been forced to use the getText() function to be able to compare the text and get the appropriate element.When we came up with the 2. solution the overall run time of the tests have been reduced and the test runs became more stable in IE8 and IE9.
How to use TestNG with Selenium WebDriver
(The precondition for this tutorial that the Selenium WebDriver is already installed.)
Firstly go to TestNG website’s download page, and follow the instructions to install the TestNG plugin to Eclipse. (http://testng.org/doc/download.html)
After the TestNG was installed, create a new java class file (without main method).
Create the setUp() function. To this function you can put that the WebDriver use for example the Firefox browser, and for example that the driver get the desired webpage.
This function will start before the test. To ensure that, before the setUp() function need to put @BeforeClass annotation.
@BeforeClass: The annotated method will be run before the first test method in the current class is invoked.
If you use only one test in the java file then you can use the @BeforeTest annotation too.
@BeforeTest: The annotated method will be run before any test method belonging to the classes inside the <test> tag is run.
Basic HTTP authentication and Webdriver
I encountered an interesting problem last week.
I had to make an automated test scripts on a test site which was protected by Basic HTTP Authentication.
I’ll assume that everybody knows how Basic HTTP Authentication works and will just focus on the solution:
 WebDriver driver = new ChromeDriver();

 driver.get("http://username:password@URL");
Of course you should change the username, password and URL strings to your data .
To pass the basic http authentication in firefox, you have to set a browser preference during the driver creation.
 FirefoxProfile profile = new FirefoxProfile();

 profile.SetPreference("network.http.phishy-userpass-length", 255);

 driver = new FirefoxDriver(profile);

 driver.get("http://username:password@URL");
How to execute JavaScript using Selenium WebDriver
Say i have a Div or a Span control like below:
<Div id="SampleDiv1">I am in Div</Div> or
<Span id="SampleSpan1">I am in Span</Div>
Here we have two solutions to get the value of the objects.
Solution 1: Use the getAttribute method.
This method is described in below location:
http://selenium.googlecode.com/svn/trunk/docs/api/java/org/openqa/selenium/WebElement.html#getAttribute%28java.lang.String%29
So for ex above, we can use like:
String sReturnText=driver.findElement(By.id("SampleSpan1")).getAttribute("innerHTML");
System.out.println(sReturnText);
Because in the above example we are trying to get text from the control we can directly use getText method like below:
String sReturnText=driver.findElement(By.id("SampleSpan1")).getText();
System.out.println(sReturnText);
Solution 2: We can get the DOM properties be JavaScript
There might be situations you will be needing to run the JavaScript in your automation. To do this/cover the example follow below steps:
String sJScript = "return document.getElementById('SampleSpan1').innerHTML;";
String sReturnText = (String) ((JavascriptExecutor) driver).executeScript(sJScript);
System.out.println(sReturnText);
How to right click and choose an option using Selenium WebDriver
For Ex: what i mean here is say you open google.com
and then right click on "About Google" and have to choose "Open Link in new Tab"
In Selenium WebDriver there is no direct way to do this.
The work around is clicking {DOWN} button. But there is a disadvantage in this approach, suppose if your options dynamically change then this approach wont work.
Here is the sample code for the above approach:
import org.openqa.selenium.By;
import org.openqa.selenium.Keys;
import org.openqa.selenium.WebDriver;
import org.openqa.selenium.WebElement;
import org.openqa.selenium.firefox.FirefoxDriver;
import org.openqa.selenium.interactions.Actions;
public class RightClickAndChooseAnOption
{
public static void main(String[] args)
{
WebDriver driver=new FirefoxDriver();
driver.navigate().to("http://www.google.com");
driver.manage().window().maximize();
WebElement oWE=driver.findElement(By.linkText("About Google"));
Actions oAction=new Actions(driver);
oAction.moveToElement(oWE);
oAction.contextClick(oWE).sendKeys(Keys.ARROW_DOWN).sendKeys(Keys.ENTER).build().perform();
}
}
How to switch between different windows using Selenium WebDriver
For that i am opening the link in a new window using clicking down button, after that moving to the specified window.
Here is the code:
import java.util.Set;
import org.openqa.selenium.By;
import org.openqa.selenium.Keys;
import org.openqa.selenium.WebDriver;
import org.openqa.selenium.WebElement;
import org.openqa.selenium.firefox.FirefoxDriver;
import org.openqa.selenium.interactions.Actions;
public class MoveBetweenTabs
{
public static void main(String[] args)
{
WebDriver driver=new FirefoxDriver();
driver.navigate().to("http://www.google.com");
driver.manage().window().maximize();
WebElement oWE=driver.findElement(By.linkText("About Google"));
Actions oAction=new Actions(driver);
oAction.moveToElement(oWE);
oAction.contextClick(oWE).sendKeys(Keys.ARROW_DOWN).sendKeys(Keys.ARROW_DOWN).sendKeys(Keys.ENTER).build().perform();
Set<String> sHandlers= driver.getWindowHandles();
for(String sHandler:sHandlers)
{
if(driver.switchTo().window(sHandler).getTitle().equals("Google"))
{
driver.switchTo().window(sHandler);
WebElement oWE1=driver.findElement(By.linkText("+Google"));
oWE1.click();
}
}
}
}
How to choose Ext JS Combo values using Selenium WebDriver
Select oSel=
new Select(oCategoryItems);It throws an error message saying,
Element should have been "select" but was "input"
The reason being Ext JS combo box are not just combo boxes, they combination of controls like,
<Input> and <Image> or <em>
<input> and <Select>
You can see the sample combo box object in Naukri.com website, which is attached

So inorder to select these items, first we need to click on the Input object and then select the value.
Following is the code for printing out all the values, you can use whatever function you want after clicking the object.
import
java.util.List;
import
org.openqa.selenium.By;
import
org.openqa.selenium.WebDriver;
import
org.openqa.selenium.WebElement;
import
org.openqa.selenium.firefox.FirefoxDriver;
import
org.openqa.selenium.support.ui.Select;
public
class PrintListBoxValues
{
{
WebDriver driver=
new FirefoxDriver();
driver.get(
"http://www.naukri.com/");
WebElement oCategory=driver.findElement(By.id(
"farea"));
oCategory.click();
WebElement oCategoryItems=driver.findElement(By.id(
"fareaSL"));
Select oSel=
new Select(oCategoryItems);
List<WebElement> oListItems=oSel.getOptions();
{
System.
out.println(oListItems.get(i).getText());
}
}
}How to check the object existance
//Max_TimeOut variable holds the time in seconds for the maximum time to wait before the control flows to NoSuchElementException block.
int Max_TimeOut=60;
public boolean isObjExists(WebDriver driver,By locator)
{
//I am putting the code in try catch because if the object does not exist, it throws exception.
try
{
//Before throwing exception, it will wait for the Max_timeout specified
WebDriverWait wait=new WebDriverWait(driver,Max_TimeOut);
wait.until(ExpectedConditions.elementToBeClickable(locator));
//If the element found, then it returns true
return true;
}
catch(NoSuchElementException exception)
{
//If the element is not found, then it returns false
return false;
}
}
This function can be invoked in like below:
By locator=By.name("Email");
if(obj.isObjExists(driver, locator))
{
Reporter.log("Object exists");
WebElement uNameElement=driver.findElement(locator);
uNameElement.sendKeys("abcd");
}
else
{
Reporter.log("Object does not exist");
}
What is the difference between WebDriver.close() and WebDriver.quit()
See the below example, here it opens the new link in a different window and upon executing the close() method, it closes the parent window and leaving the new window open.
WebDriver driver=new FirefoxDriver();
driver.get("http://google.com");
driver.manage().window().maximize();
WebElement oWE=driver.findElement(By.linkText("About Google"));
Actions oAction=new Actions(driver);
oAction.moveToElement(oWE);
oAction.contextClick(oWE).sendKeys(Keys.ARROW_DOWN).sendKeys(Keys.ARROW_DOWN).sendKeys(Keys.ENTER).build().perform();
driver.close();
Whereas, WebDriver.quit() method quits the driver, and closing every associated window.
In the above example, if you use driver.quit() in place of close , then first opens "google" page and then open the "about google" in new window and closes both the windows.
Wednesday, January 15, 2014
Steps to Configure Selenium WebDriver in Android Device
Steps to Configure Selenium Web Driver in Android Device
1. Install Android SDK
Download the SDK zip file and unzip in your local computer.
Say download at “C:\android ” location
Go to unzipped folder and click on “Android SDK Manager” and install the following:
a.Tools
b.Extras
c.Android API’s as per your choice (Say Android 2.2 , Android 4.0)
2. Install the ADT Plugin for Eclipse-
Goto Help > Install New Software....>> Add
3.Configure ADT Plugin
Window > Preferences...>>Android
Set the SDK location to where is your Android SDK has been installed.
Location will be something like: C:\android\android-sdk-windows
4. Add the new AVD
In Eclipse goto Window >>AVD Manager>>
Create new AVD by clicking on “New” button.(Give the AVD name and select the Target)
5.Now download the Android APK
Copy the file and paste it in the “Platform-tools” folder of the unzipped Android SDK.
Location will be something like “C:\android\android-sdk-windows\platform-tools “
6. Now start the Android AVD (Which has been created in Step 4) by following below in your Eclipse
Window >>AVD Manager>> Select the created AVD and click on “Start”
Window >>AVD Manager>> Select the created AVD and click on “Start”
7. Find the installed emulator device id .
open the command prompt ( cmd ) and run the following command
open the command prompt ( cmd ) and run the following command
adb devices
Emulator device id will be something like “emulator-5554”
8. Now from the command prompt, go to the “Platform-tools” folder of the unzipped Android SDK
cd "C:\android\android-sdk-windows\platform-tools"
9. Install the Android server by running the following command
adb -s emulator-id -e install -r android-server-2.21.0.apk
10. Start the Android WebDriver application by running the following command
adb -s emulator-id shell am start -a android.intent.action.MAIN -n org.openqa.selenium.android.app/.MainActivity -e debug true
11. Now setup the port forwarding in order to forward traffic from the host machine to the emulator by running the following command
adb -s emulator-id forward tcp:8080 tcp:8080
Selenium WebDriver methods with Examples
Selenium WebDriver methods with Examples
WebDriver driver = new FirefoxDriver();
driver.get("http://www.ericbieller.com/examples/dragdrop/");
driver.manage().timeouts().implicitlyWait(3,TimeUnit.MINUTES);
Actions act = new Actions(driver);
WebElement src = driver.findElement(By.xpath("//div[@id='items']/div[1]"));
WebElement des = driver.findElement(By.id("trash"));
act.clickAndHold(src).build().perform(); //For each action we need to build and Perform
act.moveToElement(des).build().perform();
act.release(des).build().perform();------------------------------------------------------------------------------------------------------------------------------
Steps to make Single Select in Drop down through Selenium Web Driver.
1. Create Driver for any Browser(Mozilla)
2. Go to the URL
3. Fetch the Drop Down element and create an object as WebElement.
4. Create an Select object for the Drop Down Element object.
5. Create a List and collect all Options through Select Object.
6. Create a Iterator object for the List.
7. Get the size of the List.
8. Loop through and check for required element.
Example
WebElement element = driver.findElement(By.name("selectedCustomer"));
Select dd= new Select(element);
List allOptions= dd.getOptions();
//To go through the list, we can use an Iterator.
//Iterator should be of the same type as the List
//which is WebElement in this case.
Iterator it = allOptions.iterator();
//Using while loop, we can iterate till the List has
//a next WebElement [hasNext() is true]
//number of items in the list
System.out.println(allOptions.size());
while(it.hasNext()){
//When you say it.next(), it points to a particular
//WebElement in the List.
WebElement el = it.next();
//Check for the required element by Text and click it
if(el.getText().equals("mango")){
System.out.println(el.getAttribute("value"));
el.click();
}
}
------------------------------------------------------------------------------------------------------------------------------
//You can deselect the options
usr.deselectAll(); //Deselect ALL selected elements
//or
usr.deselectByIndex(0); //Deselect By using Index
//or
usr.deselectByValue(value); //Deselect By using Value
//or
usr.deselectByVisibleText(text); //Deselect By using Text
------------------------------------------------------------------------------------------------------------------------------
When Browser opens in a new window or in a new tab, Web Driver cannot shift the control to the new Window/ Tab. We need to collect the window handles in a page. Whenever a new window opens we need to iterate and shift to the latest window handle.
TABS/New Window - 1
Steps to iterate through the Window Handles
1.Browser Back and Forward (NAVIGATION)
Steps to implement Browser back and forward through Selenium Web Driver
1. Create Driver for any Browser(Mozilla)
2. Go to the URL
3. Navigate to some page in website.
4. Use Selenium code to Navigate Back to Main Page.
CODE: driver.navigate().back();
driver.navigate().forward();
Example
WebDriver driver =new FirefoxDriver();
driver.get("http://seleniumhq.org/");
driver.findElement(By.linkText("Download")).click();
Thread.sleep(3000); //delay
driver.navigate().back();
driver.navigate().forward();
------------------------------------------------------------------------------------------------------------------------------
2.Handling DRAG and DROP
Steps to Handle Drag and Drop through Selenium Web Driver
1. Create Driver for any Browser(Mozilla)
2. Go to the URL
3. Create an Action object for Driver
4. Fetch and create WebElement object for the SOURCE element.
5. Fetch and create WebElement object for the DESTINATION element.
6.Perform ACTION
1.Click and Hold the source WebElement
2.Move to destination WebElement
3.Release the Element.
Example
WebDriver driver = new FirefoxDriver();
driver.get("http://www.ericbieller.com/examples/dragdrop/");
driver.manage().timeouts().implicitlyWait(3,TimeUnit.MINUTES);
Actions act = new Actions(driver);
WebElement src = driver.findElement(By.xpath("//div[@id='items']/div[1]"));
WebElement des = driver.findElement(By.id("trash"));
act.clickAndHold(src).build().perform(); //For each action we need to build and Perform
act.moveToElement(des).build().perform();
act.release(des).build().perform();------------------------------------------------------------------------------------------------------------------------------
3.Making Single Select in Drop down (Option List)
Steps to make Single Select in Drop down through Selenium Web Driver.
1. Create Driver for any Browser(Mozilla)
2. Go to the URL
3. Fetch the Drop Down element and create an object as WebElement.
4. Create an Select object for the Drop Down Element object.
5. Create a List and collect all Options through Select Object.
6. Create a Iterator object for the List.
7. Get the size of the List.
8. Loop through and check for required element.
Example
WebElement element = driver.findElement(By.name("selectedCustomer"));
Select dd= new Select(element);
List allOptions= dd.getOptions();
//To go through the list, we can use an Iterator.
//Iterator should be of the same type as the List
//which is WebElement in this case.
Iterator it = allOptions.iterator();
//Using while loop, we can iterate till the List has
//a next WebElement [hasNext() is true]
//number of items in the list
System.out.println(allOptions.size());
while(it.hasNext()){
//When you say it.next(), it points to a particular
//WebElement in the List.
WebElement el = it.next();
//Check for the required element by Text and click it
if(el.getText().equals("mango")){
System.out.println(el.getAttribute("value"));
el.click();
}
}
------------------------------------------------------------------------------------------------------------------------------
4.Making Single Select in Drop down (By INDEX, VALUE, TEXT)
Steps to make Single Select in Drop down through Selenium Web Driver.
1. Create Driver for any Browser(Mozilla)
2. Go to the URL
3. Fetch the Drop Down element and create an object as WebElement.
4. Convert the Drop Down Element in to Select object.
5. Select by INDEX
6. Select by VALUE
7. Select by VISIBLE TEXT
Example
------------------------------------------------------------------------------------------------------------------------------
1. Create Driver for any Browser(Mozilla)
2. Go to the URL
3. Fetch the Drop Down element and create an object as WebElement.
4. Convert the Drop Down Element in to Select object.
5. Select by INDEX
6. Select by VALUE
7. Select by VISIBLE TEXT
Example
WebElement customerdd = driver.findElement(By.name("customerProject.shownCustomer"));
//convert the element to select object
Select cust = new Select(customerdd);
cust.selectByIndex(1); //Select by Index
Thread.sleep(3000);
cust.selectByValue("2"); //Select by Value
Thread.sleep(3000);
cust.selectByVisibleText("mango"); //Select by Visible Text------------------------------------------------------------------------------------------------------------------------------
5.Multiple Select List Box Window
Steps to make Multiple Select in Drop down through Selenium Web Driver.
1. Create Driver for any Browser(Mozilla)
2. Go to the URL
3. Fetch the Drop Down element and create an object as WebElement.
4. Convert the Drop Down Element in to Select object.
5. Select by Index(Start index)
6. Select by Index(End index)
Example
WebElement userdd = driver.findElement(By.name("users"));
Select usr = new Select(userdd);
usr.selectByIndex(0); //Select by Index(From Start location)
usr.selectByIndex(2); //Select by index(To End Location)
------------------------------------------------------------------------------------------------------------------------------
WebElement userdd = driver.findElement(By.name("users"));
Select usr = new Select(userdd);
usr.selectByIndex(0);
usr.selectByIndex(2);
1. Create Driver for any Browser(Mozilla)
2. Go to the URL
3. Fetch the Drop Down element and create an object as WebElement.
4. Convert the Drop Down Element in to Select object.
5. Select by Index(Start index)
6. Select by Index(End index)
Example
WebElement userdd = driver.findElement(By.name("users"));
Select usr = new Select(userdd);
usr.selectByIndex(0); //Select by Index(From Start location)
usr.selectByIndex(2); //Select by index(To End Location)
------------------------------------------------------------------------------------------------------------------------------
6.Multiple Select List Box Window - DESELECT
Steps to make Deselect in Drop down through Selenium Web Driver.
1. Create Driver for any Browser(Mozilla)
2. Go to the URL
3. Fetch the Drop Down element and create an object as WebElement.
4. Convert the Drop Down Element in to Select object.
5. Select by Index(Start index)
6. Select by Index(End index)
Example
Select usr = new Select(userdd);
usr.selectByIndex(0);
usr.selectByIndex(2);
//You can deselect the options
usr.deselectAll(); //Deselect ALL selected elements
//or
usr.deselectByIndex(0); //Deselect By using Index
//or
usr.deselectByValue(value); //Deselect By using Value
//or
usr.deselectByVisibleText(text); //Deselect By using Text
------------------------------------------------------------------------------------------------------------------------------
7.iFRAMES - How to handle Frames in Web Driver
Steps to get Source of each iFrame through Selenium Web Driver.
1. Create Driver for any Browser(Mozilla)
2. Go to the URL
3. Make a List containing FRAME web elements of a Web Page.
4. Get the Size of Frames.
5. Loop though and print the Source of each Frame
Example
/*times of india website - multiple frames*/
driver.get("http://timesofindia.indiatimes.com/");
driver.manage().timeouts().implicitlyWait(30, TimeUnit.SECONDS);
List frms= driver.findElements(By.tagName("iframe")); //Frame List
System.out.println(frms.size());
for(int i=0;i
{
System.out.println(frms.get(i).getAttribute("src"));
}------------------------------------------------------------------------------------------------------------------------------
8.iFRAMES - How to perform action in Frames
Steps to perform Action in iFrame through Selenium Web Driver.
1. Create Driver for any Browser(Mozilla)
2. Go to the URL
3. Fetch iFrame element and create an Web Element object.
4. Using iFrame Web Element object, switch to IFrame.
5. Perform SendKeys/ Click action in iFrame.
Example
driver.findElement(By.id("mathuserans2")).sendKeys("8"); //Perform Action in iFrame
------------------------------------------------------------------------------------------------------------------------------
3. Fetch iFrame element and create an Web Element object.
4. Using iFrame Web Element object, switch to IFrame.
5. Perform SendKeys/ Click action in iFrame.
Example
WebElement ifr = driver.findElement(By.xpath("//iframe[@src='/poll.cms']"));
driver.switchTo().frame(ifr); //Switch to iFramedriver.findElement(By.id("mathuserans2")).sendKeys("8"); //Perform Action in iFrame
------------------------------------------------------------------------------------------------------------------------------
9.iFRAMES - How to switch to a perticular Frame through index
Steps to switch to perticular iFrame by index through Selenium Web Driver.
1. Create Driver for any Browser(Mozilla)
2. Go to the URL
3. Make a List containing FRAME web elements of a Web Page.
4. Get the Size of Frames.
5. Switch to required iFrame through index.
Example
driver.manage().timeouts().implicitlyWait(30, TimeUnit.SECONDS);
List frms= driver.findElements(By.tagName("iframe"));
System.out.println(frms.size());
driver.switchTo().frame(0);
driver.findElement(By.id("clicktripad")).click();
------------------------------------------------------------------------------------------------------------------------------
10. TABS / New Window
When Browser opens in a new window or in a new tab, Web Driver cannot shift the control to the new Window/ Tab. We need to collect the window handles in a page. Whenever a new window opens we need to iterate and shift to the latest window handle.
TABS/New Window - 1
Steps to iterate through the Window Handles
1. Create Driver for any Browser(Mozilla)
2. Go to the URL
3. Collect Window Handles through Set
4. Create an iterator to iterate through Window Handles.
5. At First iterator will not be pointing to any Window Handle, only First increment Points to First Window Handle, Second increment Points to second iterator.
Set windowHandles = driver.getWindowHandles();
Iterator it = windowHandles.iterator();
while(it.hasNext())
{
System.out.println(it.next());
}------------------------------------------------------------------------------------------------------------------------------
TABS/New Window - 2
When two browsers are opened and Web Driver need to shift the control from Parent Window to Child Window.
Please follow the steps mentioned below.
TABS/New Window - 3
When second browser is closed/you close it and Web Driver need to shift the control from Child Window to Parent Window.
Please follow the steps mentioned below.
3. Collect Window Handles through Set
4. Create an iterator to iterate through Window Handles.
5. At First iterator will not be pointing to any Window Handle, only First increment Points to First Window Handle, Second increment Points to second iterator.
Set windowHandles = driver.getWindowHandles();
Iterator it = windowHandles.iterator();
while(it.hasNext())
{
System.out.println(it.next());
}------------------------------------------------------------------------------------------------------------------------------
TABS/New Window - 2
When two browsers are opened and Web Driver need to shift the control from Parent Window to Child Window.
Please follow the steps mentioned below.
1. Create Driver for any Browser(Mozilla)
2. Go to the URL
3. Collect Window Handles through Set
4. Create an iterator to iterate through Window Handles.
5. Increment the iterator and store the Window Handle as Parent.
6. Increment the iterator and store next Window Handle as Child.
7. Switch to Child Browser using Child Window Handle.
Set windowHandles = driver.getWindowHandles();
Iterator it = windowHandles.iterator();
String parentBrowser= it.next();
String childBrowser = it.next();
driver.switchTo().window(childBrowser);
------------------------------------------------------------------------------------------------------------------------------
TABS/New Window - 3
When second browser is closed/you close it and Web Driver need to shift the control from Child Window to Parent Window.
Please follow the steps mentioned below.
1. Create Driver for any Browser(Mozilla)
2. Go to the URL
3. Collect Window Handles through Set
4. Create an iterator to iterate through Window Handles.
5. Increment the iterator and store the Window Handle as Parent.
6. Increment the iterator and store next Window Handle as Child.
7. Switch to Child Browser using Child Window Handle.
8. When Child browser get closed, Switch from Child browser to Parent Window.
Set windowHandles = driver.getWindowHandles();
Iterator it = windowHandles.iterator();
String parentBrowser= it.next();
String childBrowser = it.next();
driver.switchTo().window(childBrowser);
Thread.sleep(3000);
driver.close(); //close the current window(Child Browser)
driver.switchTo().window(parentBrowser); //Switch to Parent Browser
------------------------------------------------------------------------------------------------------------------------------
1. Set System Property for the Driver and give path of the IE Driver.
2. Create an Web Driver Object.
3. Open an URL
WebDriver driver =new InternetExplorerDriver();
driver.get("www.google.com");
------------------------------------------------------------------------------------------------------------------------------
Using Chrome with Web Driver.
Please follow the steps mentioned below.
1. Set System Property for the Driver and give path of the Chrome Driver.
2. Create an Web Driver Object.
3. Open an URL
System.setProperty("webdriver.chrome.driver", "D:\\sel\\browserdrivers\\Chromedriver.exe");
WebDriver driver = new ChromeDriver();
driver.get("www.google.com");
------------------------------------------------------------------------------------------------------------------------------
import org.openqa.Selenium.Proxy
FirefoxProfile profile = new FirefoxProfile();
String PROXY = "xx.xx.xx.xx:xx";
Proxy proxy = new Proxy();
proxy.HttpProxy=PROXY;
proxy.FtpProxy=PROXY;
proxy.SslProxy=PROXY;
profile.SetProxyPreferences(proxy);
FirefoxDriver driver = new FirefoxDriver(profile);
------------------------------------------------------------------------------------------------------------------------------
------------------------------------------------------------------------------------------------------------------------------
3. Collect Window Handles through Set
4. Create an iterator to iterate through Window Handles.
5. Increment the iterator and store the Window Handle as Parent.
6. Increment the iterator and store next Window Handle as Child.
7. Switch to Child Browser using Child Window Handle.
8. When Child browser get closed, Switch from Child browser to Parent Window.
Set windowHandles = driver.getWindowHandles();
Iterator it = windowHandles.iterator();
String parentBrowser= it.next();
String childBrowser = it.next();
driver.switchTo().window(childBrowser);
Thread.sleep(3000);
driver.close(); //close the current window(Child Browser)
driver.switchTo().window(parentBrowser); //Switch to Parent Browser
------------------------------------------------------------------------------------------------------------------------------
11. CALENDAR popups
Calendar PopUp - 1
Normal Calender(current month) Popup can be handled in the following way.
1. Create Driver for any Browser(Mozilla)
2. Go to the URL
3. Fetch the Calender element and click to open.
4. Fetch the required date through xpath and click.
/*IRCTC calendar*/
driver.findElement(By.id("calendar_icon1")).click();
driver.findElement(By.xpath("//div[@id='CalendarControl']/table[tbody[tr[td[text()='October 2012']]]]/descendant::a[text()='5']")).click();
------------------------------------------------------------------------------------------------------------------------------
Calendar PopUp - 2 (Customized wait)
In a Calender if we want to click on future month which is not currently displayed, we need to click on next link until we get the required month.
This can be done by writing Customized wait. Check for particular date element in each month, if not found move to next month.
/*makemytrip calendar*/
driver.get("http://www.makemytrip.com/");
driver.manage().timeouts().implicitlyWait(30, TimeUnit.SECONDS);
driver.findElement(By.id("deptDateRtripimgExact")).click(); //find Calendar
driver.manage().timeouts().implicitlyWait(0, TimeUnit.SECONDS);
boolean flag=true;
while(flag){
try {
WebElement el = driver.findElement(By.xpath("//div[contains(@class,'ui-datepicker-group') and descendant::span[text()='March']]/descendant::a[text()='5']")); // Required future date
if(el !=null) //Check if the required date element is found or not
{
el.click(); // if required Date is found, then click the date
flag=false;
}
}
catch (Exception e) { //Catches exception if no element found
try {
Thread.sleep(500);
driver.findElement(By.xpath("//a[@title='Next']")).click(); //Click on next month
}
catch (InterruptedException e1)
{
// TODO Auto-generated catch block
e1.printStackTrace();
}
}
}
------------------------------------------------------------------------------------------------------------------------------
In order to click on an menu item, first we need to move the mouse over Parent menu, later we can click on any of the Menu child item.
Please follow the steps mentioned below.
JavascriptExecutor js = (JavascriptExecutor) driver;
String jsCmd = "document.getElementsByName('city')[0].value='ban'";
js.executeScript(jsCmd);
------------------------------------------------------------------------------------------------------------------------------
3. Fetch the Calender element and click to open.
4. Fetch the required date through xpath and click.
/*IRCTC calendar*/
driver.findElement(By.id("calendar_icon1")).click();
driver.findElement(By.xpath("//div[@id='CalendarControl']/table[tbody[tr[td[text()='October 2012']]]]/descendant::a[text()='5']")).click();
------------------------------------------------------------------------------------------------------------------------------
Calendar PopUp - 2 (Customized wait)
In a Calender if we want to click on future month which is not currently displayed, we need to click on next link until we get the required month.
This can be done by writing Customized wait. Check for particular date element in each month, if not found move to next month.
/*makemytrip calendar*/
driver.get("http://www.makemytrip.com/");
driver.manage().timeouts().implicitlyWait(30, TimeUnit.SECONDS);
driver.findElement(By.id("deptDateRtripimgExact")).click(); //find Calendar
driver.manage().timeouts().implicitlyWait(0, TimeUnit.SECONDS);
boolean flag=true;
while(flag){
try {
WebElement el = driver.findElement(By.xpath("//div[contains(@class,'ui-datepicker-group') and descendant::span[text()='March']]/descendant::a[text()='5']")); // Required future date
if(el !=null) //Check if the required date element is found or not
{
el.click(); // if required Date is found, then click the date
flag=false;
}
}
catch (Exception e) { //Catches exception if no element found
try {
Thread.sleep(500);
driver.findElement(By.xpath("//a[@title='Next']")).click(); //Click on next month
}
catch (InterruptedException e1)
{
// TODO Auto-generated catch block
e1.printStackTrace();
}
}
}
------------------------------------------------------------------------------------------------------------------------------
12. Drop Down MENU
In order to click on an menu item, first we need to move the mouse over Parent menu, later we can click on any of the Menu child item.
Please follow the steps mentioned below.
1. Create Driver for any Browser(Mozilla)
2. Go to the URL
3. Fetch the MENU Parent element and create a WebElement object.
4. Create an Action object for Driver
5. Through Action object, move to Parent element.
6. Give a Delay for menu items to be displayed.
7. Fetch the Child item through xpath and Click on it.
//move to the parent menu item
3. Fetch the MENU Parent element and create a WebElement object.
4. Create an Action object for Driver
5. Through Action object, move to Parent element.
6. Give a Delay for menu items to be displayed.
7. Fetch the Child item through xpath and Click on it.
WebElement parentMenu = driver.findElement(By.linkText("Tourist Trains"));
Actions act = new Actions(driver); // Create an Action object//move to the parent menu item
act.moveToElement(parentMenu).build().perform();
Thread.sleep(3000); //wait till the child items are displayed
driver.findElement(By.linkText("Bharat Tirth")).click();
------------------------------------------------------------------------------------------------------------------------------
13. Context Click (Right Click)
We can use keyboard keys to Make a Right Click.
Please follow the steps mentioned below.
Please follow the steps mentioned below.
1. Create Driver for any Browser(Mozilla).
2. Go to the URL.
3. Fetch the MENU Parent element and create a WebElement object.
4. Create an Action Object for Driver.
5. Through Action Object, make a Context Click on Menu Parent object.
6. Through Action Object, send keys for ARROW_DOWN/ARROW_UP/Keys.ENTER.
Example
WebElement parentMenu = driver.findElement(By.linkText("Tourist Trains"));
Actions act = new Actions(driver); //Create Action object for Driver
act.contextClick(parentMenu).build().perform(); //Context Click
act.sendKeys(Keys.ARROW_RIGHT).build().perform();
Thread.sleep(1000);
act.sendKeys(Keys.ARROW_DOWN).build().perform();
Thread.sleep(1000);
act.sendKeys(Keys.ENTER).build().perform();
------------------------------------------------------------------------------------------------------------------------------
14. JAVA SCRIPT example
We can use java script command to perform actions.
We can write code to fill up the text box through java script.
1. Create Driver for any Browser(Mozilla).
2. Go to the URL.
3. Create Java Script executor object for the Driver.
4. Store the Java Script command in a String Variable.
5. Java Script Executor object executes the command in the Variable.
3. Create Java Script executor object for the Driver.
4. Store the Java Script command in a String Variable.
5. Java Script Executor object executes the command in the Variable.
JavascriptExecutor js = (JavascriptExecutor) driver;
String jsCmd = "document.getElementsByName('city')[0].value='ban'";
js.executeScript(jsCmd);
------------------------------------------------------------------------------------------------------------------------------
15. Multiple Elements
We can count the number of links present in the page. We can also print the link text of each Web link.
Please follow the steps mentioned below.
Using Internet Explorer with Web Driver.
Please follow the steps mentioned below.Please follow the steps mentioned below.
1. Create Driver for any Browser(Mozilla).
2. Go to the URL.
3. Fetch elements with tag //a in the entire page, store it in a List.
4. Get the count of Links present in the Page.
5. Loop through the links and print the Attributes
List allLinks= driver.findElements(By.xpath("//a"));
//display the count of links in the page
System.out.println(allLinks.size());
//display the text for each link on the page
for(int i=0;i
{
//display href for each link
System.out.println(allLinks.get(i).getAttribute("href"));
//display text for each link
System.out.println(allLinks.get(i).getText());
//perform click action
allLinks.get(i).click();
}
------------------------------------------------------------------------------------------------------------------------------
16. Other Browser (Internet Explorer)
Using Internet Explorer with Web Driver.
1. Set System Property for the Driver and give path of the IE Driver.
2. Create an Web Driver Object.
3. Open an URL
System.setProperty("webdriver.ie.driver", "D:\\sel\\browserdrivers\\IEDriverServer.exe");
WebDriver driver =new InternetExplorerDriver();
driver.get("www.google.com");
------------------------------------------------------------------------------------------------------------------------------
17. Other Browser (Chrome)
1. Set System Property for the Driver and give path of the Chrome Driver.
2. Create an Web Driver Object.
3. Open an URL
System.setProperty("webdriver.chrome.driver", "D:\\sel\\browserdrivers\\Chromedriver.exe");
WebDriver driver = new ChromeDriver();
driver.get("www.google.com");
------------------------------------------------------------------------------------------------------------------------------
18. PROXY settings.
Please follow the steps mentioned below.
1. Import Selenium.Proxy
2. Create a Profile object for Firefox
3. Create a string variable with value.
4. Create a Proxy object.
5. Set the values through proxy.
6. Set the proxy preference to proxy object using profile object.
7. Pass the profile object to Firefox Driver.
import org.openqa.Selenium.Proxy
FirefoxProfile profile = new FirefoxProfile();
String PROXY = "xx.xx.xx.xx:xx";
Proxy proxy = new Proxy();
proxy.HttpProxy=PROXY;
proxy.FtpProxy=PROXY;
proxy.SslProxy=PROXY;
profile.SetProxyPreferences(proxy);
FirefoxDriver driver = new FirefoxDriver(profile);
19. Page Onload authentication
Sometimes when you are
Automating Web pages, you may come across Page onload Authentication
window. This window is not java popup/div. It is windows popup. Selenium
directly cannot handle this windows popup.
Hence we use Autoit sowftware tool. Through Selenium we can handle this situation using Autoit.
Please follow the steps mentioned below.
1.Download Autoit from the following URl
( http://www.autoitscript.com/site/autoit/downloads/ )
2.Install downloaded software.
3. Open Script Editor
Start=>ProgramFiles=>AutoIt =>SciTE Script Editor.
4.Open Object Identifier.
Start=>ProgramFiles=>AutoIt =>AutoIt Window Info.
5.Drag and Drop finder tool in AutoIt Window Info, to the Window you need to identify.
6.Collect the Title Name of window from (AutoIt Window Info.)
7.Write the Script in the Editor.
----------------------------------------------------AUTOIT CODE-----------------------------------------------------
WinWaitActive("Authentication Required")
Send("admin")
Send("{TAB} admin{TAB} {ENTER}")
------------------------------------------------------------------------------------------------------------------------------
8.Save the file as default save.(Authentication1.exe)
9.RUN/Compile the SCRIPT, it creates an exe.
10.Mention the exe path in the Program before creation of Driver.
EXAMPLE:
Process P = Runtime.getRuntime().exec("D:\\java_prj\\SELENIUM WEBDRIVER\\AUTOIT\\Authentication1.exe");
WebDriver driver = new FirefoxDriver();
driver.get("http://192.168.1.1");
Process P = Runtime.getRuntime().exec("D:\\java_prj\\SELENIUM WEBDRIVER\\AUTOIT\\Authentication1.exe");
WebDriver driver = new FirefoxDriver();
driver.get("http://192.168.1.1");
20. File Download
Please follow the steps mentioned below.
1. Create a PROFILE object of Browser.
2. Set Preference, by giving Download destination Directory.
3. Set Preference, by giving Default Folder. 0 => Desktop, 1=>System Default Location, 2 => Indicates a custom Folder Location
4. Set Preference, A comma-separated list of MIME types to save to disk without asking what to use to open the file. Default value is an empty string.
After coding the above mentioned steps, now start the driver and click on Download button/link.
1. Create Driver for any Browser(Mozilla).
2. Go to the URL.
3. Fetch the Download web element and click.
FirefoxProfile Prof = new FirefoxProfile();
Prof.setPreference("browser.download.dir", "D:\\java prj");
Prof.setPreference("browser.download.folderList", 2);
Prof.setPreference("browser.helperApps.neverAsk.saveToDisk","application/zip");
WebDriver driver = new FirefoxDriver(Prof);
driver.get("http://seleniumhq.org/download/");
driver.manage().timeouts().implicitlyWait(3,TimeUnit.MINUTES);
driver.findElement(By.xpath("//a[@name='client-drivers']/table/tbody/tr[1]/td[4]/a")).click();
------------------------------------------------------------------------------------------------------------------------------
21. File Upload
Please follow the steps mentioned below.
1. Create Driver for any Browser(Mozilla).
2. Go to the URL.
3. Store the Source path of file in a variable.
4. Fetch the Upload web element text box and give path using variable.
5. Fetch the upload button and click
WebDriver driver = new FirefoxDriver();
driver.get("http://www.2shared.com/");
String FilePath = "C:\\Users\\abc\\Desktop\\test.xml";
driver.findElement(By.id("upField")).sendKeys(FilePath);
driver.findElement(By.xpath("//input[@type='image']")).click();
------------------------------------------------------------------------------------------------------------------------------
22. Handling JAVA ALERT
Sometimes you may get alerts as anticipated(through Insert/update/delete operation in database). These may be JAVA alerts.
Please follow the steps mentioned below to handle Alerts.
Please follow the steps mentioned below to handle Alerts.
1. Create Driver for any Browser(Mozilla).
2. Go to the URL.
3. You get an alert asking to click on 'YES' or 'NO' button.
4. First Confirm if it is JAVA alert window.
5. Write a code to switch the control to Alert window.
6. In the Alert window, either ACCEPT by clicking on 'YES'
or CANCEL by clicking on 'NO'.
WebDriver driver = new FirefoxDriver();
driver.get("http://www.2shared.com/");
driver.manage().timeouts().implicitlyWait(3,TimeUnit.MINUTES);
Alert alert = driver.switchTo().alert();
alert.accept();
//or
alert.dismiss();
Subscribe to:
Comments (Atom)